
Correcting exposure retrospectively with Urban Lightscape
On the Dot

The Urban Lightscape photo tool lets you adjust local brightness levels within an image, thus turning a simple snapshot into a real eye-catcher.
You have a great subject and have captured it impeccably in a photograph, but when you open the file on your computer, you notice an overexposed spot that leaves part of the image blurry or difficult to see. Don't panic; try Urban Lightscape [1], a tool that adjusts brightness just in the area that really needs fixing.
Urban Lightscape is available for Windows, Mac, and Linux. License fees are charged for the Windows and Mac versions, but the program is available for free for Linux users who are willing to build it from the source code. Ubuntu users can also obtain Urban Lightscape through a PPA archive [2], which simplifies the installation for non-technical users. All you need is a short excursion to the command line:
$ sudo add-apt-repository ppa:dhor/myway
$ sudo apt-get update
$ sudo apt-get install urbanlightscape
To run the program, just enter urbanlightscape at the command line.
Image Formats
The first step is to load your photos. Dragging and dropping from the file manager does not work; the only solution is via the File dialog. There, you have a number of formats from which to choose, including JPEG, PNG, TIFF, and various Windows formats. The formats from Photoshop and RAW files are missing from the selection; however, the All files choice allowed me to load RAW images from a Canon camera.
Getting Started
Once you have the first photo loaded, you can get straight to work. The program impresses with its very simple structure (Figure 1), and you might be surprised by how few controls are in the interface. However, don't worry; you'll have nothing to enable or install later.
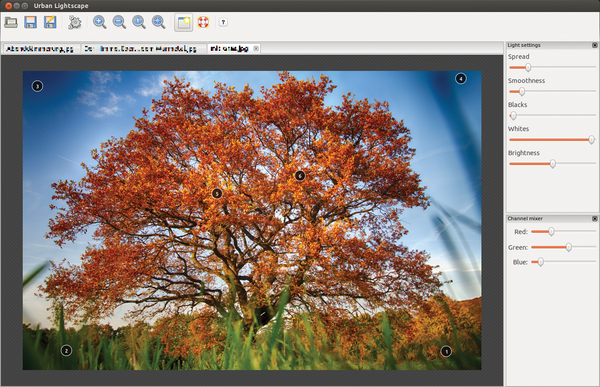 Figure 1: The interface has just a few controls that let you affect the result.
You can easily create your first control point by double-clicking on a point of the image that you want to customize. After a moment, you see a control point – a small circle with a serial number (Figure 2) – appear. These control points are similar to the U-point controls in the Nik Collection [3].
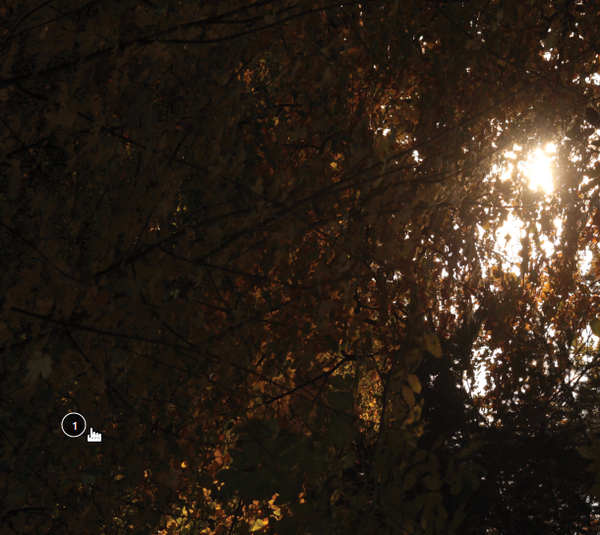 Figure 2: Double-clicking a desired area of the image creates a new control point.
Holding down the mouse button after double-clicking lets you modify the control point. Drag the mouse up to increase the brightness; drag the mouse down to make the point and the adjacent area slightly darker (Figure 3). You can then add any number of additional control points to give the image the right balance in terms of brightness (Figure 4).
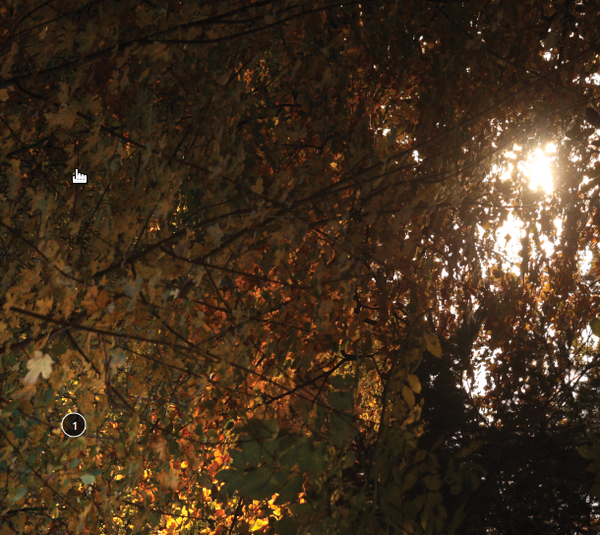 Figure 3: Drag the mouse up or down to adjust the brightness at the control point and around it.
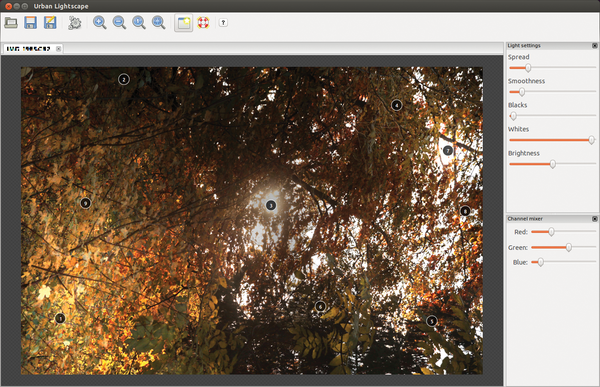 Figure 4: A larger number of control points lets you control the brightness distribution in the image very precisely.
Smart Distribution
Depending on the nature of the photo, it can make sense to add a relatively large number of control points – in some cases, the desired effect even requires you to do so. The process is not particularly complicated, because you can create a point quite quickly.
It may happen that two adjacent control points brighten up part of the image, but between them lies a region that you want to keep darker. To address this, insert an additional intermediate control point that takes the brightness down a bit. At difficult points of the image, you are likely to produce a jumble of control points quickly.
You have the option of adjusting the control points later on. To do so, use View | Overlay to enable the view showing the numbered control points. Then double-click and hold to change the values, just as you did when creating them. You can also use the mouse in this mode to move the control points. To delete a control point, simply drag it out of the window.
Buy this article as PDF
(incl. VAT)
Buy Linux Magazine
US / Canada
UK / Australia
Subscribe to our Linux Newsletters
Find Linux and Open Source Jobs
Subscribe to our ADMIN Newsletters
Support Our Work
Linux Magazine content is made possible with support from readers like you. Please consider contributing when you’ve found an article to be beneficial.

News
-
Endless OS 6 has Arrived
After more than a year since the last update, the latest release of Endless OS is now available for general usage.
-
Fedora Asahi 40 Remix Available for Macs with Apple Silicon
If you've been anticipating KDE's Plasma 6 for your Apple Silicon-powered Mac, then you're in luck.
-
Red Hat Adds New Deployment Option for Enterprise Linux Platforms
Red Hat has re-imagined enterprise Linux for an AI future with Image Mode.
-
OSJH and LPI Release 2024 Open Source Pros Job Survey Results
See what open source professionals look for in a new role.
-
Proton 9.0-1 Released to Improve Gaming with Steam
The latest release of Proton 9 adds several improvements and fixes an issue that has been problematic for Linux users.
-
So Long Neofetch and Thanks for the Info
Today is a day that every Linux user who enjoys bragging about their system(s) will mourn, as Neofetch has come to an end.
-
Ubuntu 24.04 Comes with a “Flaw"
If you're thinking you might want to upgrade from your current Ubuntu release to the latest, there's something you might want to consider before doing so.
-
Canonical Releases Ubuntu 24.04
After a brief pause because of the XZ vulnerability, Ubuntu 24.04 is now available for install.
-
Linux Servers Targeted by Akira Ransomware
A group of bad actors who have already extorted $42 million have their sights set on the Linux platform.
-
TUXEDO Computers Unveils Linux Laptop Featuring AMD Ryzen CPU
This latest release is the first laptop to include the new CPU from Ryzen and Linux preinstalled.