Security with the Trusted Platform Module
Trusted Computing
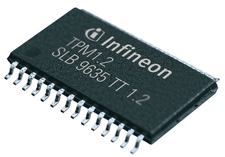
The Trusted Platform Module on your computer's motherboard could lead to better security for your Linux system.
The security of any operating system (OS) layer depends on the security of every layer below it. If the CPU can't be trusted to execute code correctly, there's no way to run secure software on that CPU. If the bootloader has been tampered with, you cannot trust the kernel that the bootloader boots. Secure Boot allows the firmware to validate a bootloader before executing it, but if the firmware itself has been backdoored, you have no way to verify that Secure Boot functioned correctly.
This problem seems insurmountable: You can only trust the OS to verify that the firmware is untampered with if the firmware itself has not been tampered with. How can you verify the state of a system without having to trust it first?
The answer lies in a set of technologies collectively referred to as Trusted Computing. A consortium of companies called the Trusted Computing Group [1] maintains the specifications related to Trusted Computing. At the heart of the Trusted Computing environment is a small hardware component called a Trusted Platform Module (TPM). The TPM is a chip connected by bus to the system motherboard, and sometimes it can be retrofitted as a module (Figure 1). TPMs are not fast or powerful – almost anything that can be done on a TPM can be done much faster on the CPU. Neither can the TPM see what's happening on the rest of the system; TPMs know only what the rest of the computer chooses to tell them.
However, it's how TPMs make use of this information that makes them so powerful. TPMs have a collection of registers called Platform Configuration Registers (PCRs). (See the box titled "Writing to the TPM.") When the system is reset, these registers are set to
. During the boot process, the system will generate cryptographic hashes of the boot components and pass these hashes to the TPM. Any modifications to the boot components will change the values of these hashes, and consequently change the values recorded by the TPM. This process is referred to as "measurement," and a boot that occurs in this way is a Measured Boot.
Writing to the TPM
When new values are given to the TPM, they are not written directly to the PCRs. Instead, the PCR will be set to a value determined by the combination of the PCR's current value and the new value given to it. If the component to be measured is the string Hello world, and the PCR's current value is c72bf7f5a487b1e75819b5b1d1644ded23c10967, the new value would be:
SHA1(c72bf7f5a487b1e75819b5b1d1644ded23c10967 || SHA1("Hello world"))
In other words, the SHA1
(a cryptographic hash) of Hello world is appended to the current value of the PCR, and the PCR is then set to the SHA1
of that concatenated value. This means that the order of measurements matters; measuring Hello moon and then measuring Goodbye sun will result in a different PCR value than measuring Goodbye sun and then Hello moon.
Different components are measured into different PCRs (Table 1). Each component is measured before it starts executing and, in turn, measures the next component before executing it, starting with the CPU measuring the firmware. If the firmware has been tampered with, PCR0 will be different. Even if the firmware then lies about the measurements of all later components (by pretending the values are correct even though they've been tampered with), the value of PCR0 will still be different. By looking at the PCR values and comparing them with expected values, you can tell whether any part of the boot process has been compromised.
Table 1
PCRs
PCR | Measurement |
---|---|
PCR0 |
System firmware |
PCR1 |
System firmware configuration |
PCR2 |
Plugin card firmware |
PCR3 |
Plugin card firmware configuration |
PCR4 |
Partition table and bootloader |
PCR5 |
Bootloader configuration |
PCR6 |
Suspend and resume events |
PCR7 |
Secure Boot configuration |
But how do you look at those values? If the OS has been compromised, you can't trust the OS to give you the actual values stored in the TPM. You need more help from the TPM itself. This brings me to the next piece of functionality that TPMs provide – the ability to generate and store encryption keys.
When a TPM is initialized, it generates a key called the Storage Root Key (SRK). This key never leaves the TPM, and the OS has no way to access it. When an application asks the TPM to generate a key, the TPM does so and gives the public and private halves back to the application. However, before handing back the private half, the TPM encrypts it with the SRK. The private key can only be used by passing it back to the TPM, which will then decrypt it and store it in the TPM's internal RAM. Any material that's been encrypted with the public half of the key can only be decrypted by the TPM that can read the corresponding private key: If you have a TPM key pair and someone steals your hard drive, the thief will have no way of using those keys because they can only be decrypted by the TPM that generated them.
When an application asks for something to be encrypted with this key, it can specify a set of PCR values to be associated with the encrypted material. When it comes to decryption time, if those PCR values do not match, the TPM will refuse to decrypt the material. If you use the TPM to encrypt your disk encryption key, your machine will refuse to boot if any of the boot process is modified [2]. If you're using UEFI instead of BIOS, use the verifier_tpm_module
branch of GRUB [3] instead of TrustedGRUB2.
When configured this way, a system that's been tampered with will simply refuse to boot, although it doesn't prevent an attacker with physical access from obtaining your passwords. They can simply remove your hard drive and replace it with one that boots normally even if the boot process has been modified. When you try to log in, it simply saves your password and sends it to the attacker. One approach for avoiding this is tpmtotp
[4], which uses the time-based one-time password (TOTP) protocol used by websites for two-factor authentication (2FA). A secret is encrypted on the TPM and can only be decrypted if the PCR values match. The secret is then displayed in the form of a QR code that can be enrolled into a regular 2FA application. On boot, the system decrypts the secret and uses that in combination with the current time of day to display a six-digit value. The user compares this value to the value their phone is displaying. If they match, the user knows that the system is trustworthy and can enter the password safely. (See also the box titled "RAM Option.")
RAM Option
An alternative approach is to use the TPM's small quantity of non-volatile RAM. You can configure the system so that the non-volatile RAM is only readable if the PCR values match – if they don't match, then attempting to read will fail. This approach allows a secret to be stored directly without having to worry about encryption. The downside to this technique is that the amount of nvram
available is quite limited.
Of course, even legitimate updates of the boot components will change the values of the PCRs. Updating GRUB will change the value of PCR4, for instance, which introduces a great deal of fragility into the system: Regular security updates may render a system unbootable. One way around this is to use the TPM in conjunction with Secure Boot. In this mode, only PCR7 is used. The firmware records the fact that Secure Boot is enabled into PCR7 and then measures each Secure Boot key that is used during the boot process. Modifying the bootloader or kernel would require the attacker to disable Secure Boot or to add new signing keys, so it would change the value of PCR7. Legitimate updates will be signed with the same key, so it won't change the value. This gives users much greater confidence that they can use TPMs safely without having to worry about their system breaking unexpectedly.
TPM encryption keys are not restricted to the boot process. It's possible to generate SSH keys that are tied to the TPM [5], giving enhanced protection. If someone manages to steal your private SSH key, they will still be unable to log in to your system unless they have access to your TPM to decrypt it.
TPMs and DRM
When Trusted Computing first appeared in the mid-2000s, people were greatly concerned that TPMs could be used to restrict access to websites or services if the user wasn't running the right version of Windows. The biggest concern was remote attestation. Each TPM has a key called an endorsement key (EK). A remote site can ask the OS to perform remote attestation, at which point the OS asks the TPM for the current PCR values and encrypts them with the EK. The remote site decrypts them, looks at the PCR values, and decides to grant access depending on the values provided.
Two big problems prevent this from being a real concern. First, for this to be viable, the remote site has to know that the EK is really from the TPM. More modern TPMs include an EK certificate that provides a chain of trust from the TPM to the TPM manufacturer, which means that a remote site can verify that the PCR values came from a TPM; however, they have no way of knowing which TPM unless the user has already registered this association in some way – which ties to the second problem: Nothing prevents a user from adding a second TPM to a system, programming the PCRs with "good" values, and then performing remote attestation with the second TPM.
Because of these problems (and other privacy concerns), remote attestation has never been used outside specific corporate or special case deployments, and this is unlikely to change in the future. Enabling your TPM does not put you at risk of having your freedoms infringed.
Using Your TPM
Using a TPM requires a few requirements. First, the TPM must be enabled; second, you must have an appropriate bootloader; and third, you must have the necessary userspace tools. The TPM can be enabled in your system firmware menu – consult your system documentation to find out how. For bootloaders, right now you'll need to use a modified version of GRUB 2 [6]. Finally, you'll need to install TrouSerS (the TPM daemon and library) and the tpm-tools package. You need to take ownership of your TPM by running:
sudo tpm_takeownership -z
If you get an error saying "The TPM target command has been disabled," this means that the TPM has already been enabled. If you didn't do this, you can reset the TPM by running
echo 14 >/sys/class/tpm/tpm0/ppi/request
as root and then rebooting. The firmware will then ask whether you want to clear the TPM. Follow the instructions given and try taking ownership again.
TPM 1.2 and TPM 2
Recent systems frequently ship with TPMs that conform to version 2 of the specification. Version 2 is an improvement in several ways, including support for more modern and secure hash algorithms. Unfortunately, support for TPM 2 devices in Linux is still maturing, and most of the software described in this article is only compatible with the older version, TPM 1.2.
Some systems ship with TPM 1.2 on the motherboard, but also implement TPM 2 in the form of an emulated TPM running on the Management Engine integrated into the CPU. In that case, check the system settings for a reference to "Intel PTT," "Intel Platform Trust Technology," or "Firmware TPM" and disable it.
Some vendors have taken an alternative approach and ship a hardware TPM on the motherboard that can be flashed between versions 1.2 and 2.0. Dell does this on the XPS 13. Check with your system vendor to find out whether your TPM can be downgraded to 1.2.
Buy this article as PDF
(incl. VAT)
Buy Linux Magazine
Subscribe to our Linux Newsletters
Find Linux and Open Source Jobs
Subscribe to our ADMIN Newsletters
Support Our Work
Linux Magazine content is made possible with support from readers like you. Please consider contributing when you’ve found an article to be beneficial.
News
-
Linux Kernel 6.13 Offers Improvements for AMD/Apple Users
The latest Linux kernel is now available, and it includes plenty of improvements, especially for those who use AMD or Apple-based systems.
-
Gnome 48 Debuts New Audio Player
To date, the audio player found within the Gnome desktop has been meh at best, but with the upcoming release that all changes.
-
Plasma 6.3 Ready for Public Beta Testing
Plasma 6.3 will ship with KDE Gear 24.12.1 and KDE Frameworks 6.10, along with some new and exciting features.
-
Budgie 10.10 Scheduled for Q1 2025 with a Surprising Desktop Update
If Budgie is your desktop environment of choice, 2025 is going to be a great year for you.
-
Firefox 134 Offers Improvements for Linux Version
Fans of Linux and Firefox rejoice, as there's a new version available that includes some handy updates.
-
Serpent OS Arrives with a New Alpha Release
After months of silence, Ikey Doherty has released a new alpha for his Serpent OS.
-
HashiCorp Cofounder Unveils Ghostty, a Linux Terminal App
Ghostty is a new Linux terminal app that's fast, feature-rich, and offers a platform-native GUI while remaining cross-platform.
-
Fedora Asahi Remix 41 Available for Apple Silicon
If you have an Apple Silicon Mac and you're hoping to install Fedora, you're in luck because the latest release supports the M1 and M2 chips.
-
Systemd Fixes Bug While Facing New Challenger in GNU Shepherd
The systemd developers have fixed a really nasty bug amid the release of the new GNU Shepherd init system.
-
AlmaLinux 10.0 Beta Released
The AlmaLinux OS Foundation has announced the availability of AlmaLinux 10.0 Beta ("Purple Lion") for all supported devices with significant changes.