
Network monitoring from the cloud
Lookout

© Lead Image © damedeeso, 123RF.com
Netdata helps you monitor your network with ease through a cloud dashboard.
Netdata [1] is a distributed, real-time, performance and health monitoring tool that can be used to monitor machines running Linux, FreeBSD, and macOS, as well as Kubernetes and Docker. Available for free under a GPLv3 license, you can run Netdata on physical machines, virtual machines, containers, and even on Internet of Things (IoT) devices, thanks to its minimal resource footprint.
Netdata's dashboard balances both form and function and does a nice job of visualizing a computer's processes and services. You can use Netdata to monitor the CPU, RAM usage, disk I/O, and network traffic, along with several other aspects of the systems on which it runs. In addition to hardware, it can also keep an eye on web servers, databases, and applications. Netdata's interactive dashboard can also store long-term historical metrics for days, weeks, or months, all at one second granularity.
Designed by system administrators, DevOps engineers, and developers, Netdata not only visualizes the collected metrics, but it also identifies and troubleshoots complex performance problems without wasting time. In fact, Netdata complements its monitoring features with an alarm notification system that will detect performance and availability issues.
One of the best things about Netdata is that the tool ships with sensible defaults, letting you put it into active service immediately after installation. That said, once you are more familiar with Netdata, you can rely on its extensive customization options and tune it to better align with your requirements.
Client Rollout
To use Netdata, you'll have to install the Netdata Agent on all your computers. The agent also installs its own custom database engine to store all the collected metrics. These will then be visualized on the cloud-based dashboard.
Netdata offers several installation options [2], although the recommended way is to use its one-line installation script. The script will fetch all the components necessary to compile the Netdata Agent on your computer. Fire up a terminal on the machine you want to monitor and enter the following command as a regular Linux user:
$ bash <(curl -Ss https://my-netdata.io/kickstart.sh)
That's all there's to it. The script will refresh the package management repositories and install all the dependencies before compiling the Netdata Agent. It'll also ensure that the agent keeps itself updated with nightly releases.
Another popular option is to install the Netdata Agent inside a Docker container [3]. This is useful for a one-off analysis of a host, since it makes no permanent changes to the host computer and can be easily removed.
After installing the agent, fire up a web browser on the computer and head to http://localhost:19999. This will bring up Netdata's dashboard (Figure 1) and show you the live metrics from the system. You can also view the metrics from any other computer on the network. Just replace localhost with the IP address of the computer on which you've installed the agent.
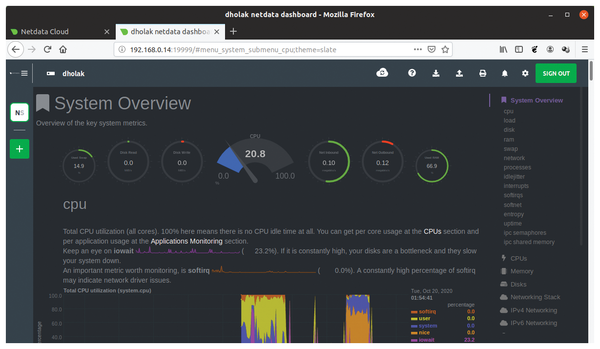 Figure 1: Netdata claims it collects thousands of metrics per server every second, using just about one percent of a single core's CPU.
Monitor Multiple Machines
To monitor multiple machines, use the one-line installation script to install the agent on all the computers you want to monitor. The agents are distributed by design, which means they operate independently of each other and only collect and chart the metrics for the system on which they are installed.
To string together the various agents into a single interface, you'll have to sign up for a free account with the Netdata Cloud service, which will collate and display metrics from all the agents deployed on your network (see the "Netdata Cloud" box).
Netdata Cloud
Netdata Cloud shows you all the computers on your network in single screen view. To get started, head to https://app.netdata.cloud and use any of the options to create an account with the service.
Once your account has been created, the Netdata Cloud will take you through a brief on-boarding process. During this process, you'll be asked to create at least one Space and one War Room. The Spaces and War Rooms help you organize the computers in your network. Think of them as virtual spaces that help you customize how you and your team use Netdata Cloud to monitor your infrastructure.
You can read about the Netdata Cloud's organizational benefits to familiarize yourself with the concept of Spaces and War Rooms [4]. For now, just create one of each as requested. You'll use them later to monitor your computers.
Once you have the login credentials, bring up the dashboard on any of the monitored computers. Click the Sign In button at the top of the dashboard and then enter your Netdata Cloud account credentials when prompted. You'll be redirected back to the Netdata dashboard, which now sports a new menu on the left. The computer will be listed under the Visited Nodes section.
To add more computers, navigate to their respective dashboards and use the Sign In button to connect them to your Netdata Cloud account. As you connect more computers, they'll start populating the Visited Nodes section. Once you've added more than one node, you can switch between them from the menu.
Claim Systems
When you sign into the Netdata Cloud service from the dashboard, your computers will be listed under the Visited Nodes section. You should also take a moment to add computers to the Space you created when signing up for the Netdata Cloud account.
The process of adding a node to a Space is called claiming. Claiming makes sure you have administrative access to the computer and the Netdata Agent running on it. You'll be given a chance to claim a computer during the signup process for your Netdata Cloud account. Of course, you can also do this later from within the Space as well.
To add a computer to a Space, log into the Netdata Cloud account and select a Space from the list on the left. Now click the green + icon within the Space, which will reveal a rather long command (Figure 2). Copy the command, and paste it in a terminal on the computer you want to claim.
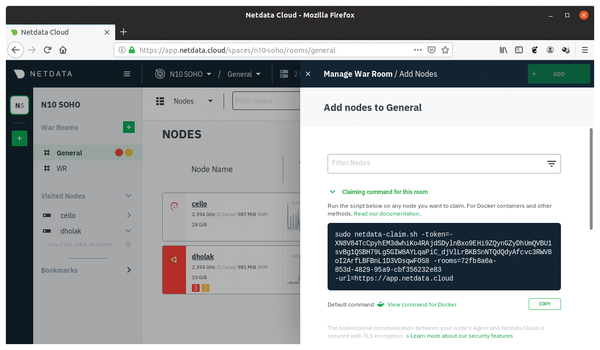 Figure 2: Netdata uses the Agent-Cloud link (ACLK) to securely transmit the metrics from the agent to the Cloud.
After verifying your credentials, the computer will be added to the Space (Figure 3). Now you can repeat the claiming process on every computer you want to add to Netdata Cloud. Remember that you can only claim a computer inside a single Space. Once claimed, however, you can add that computer to multiple War Rooms within the Space.
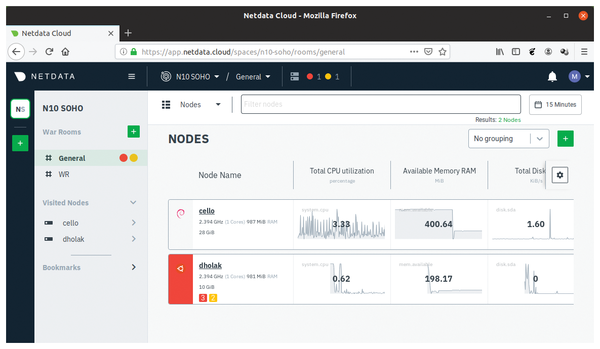 Figure 3: In addition to the metrics, Netdata also transmits information regarding all configured alarms and their current status to the Cloud.
Buy this article as PDF
(incl. VAT)
Buy Linux Magazine
US / Canada
UK / Australia
Subscribe to our Linux Newsletters
Find Linux and Open Source Jobs
Subscribe to our ADMIN Newsletters
Support Our Work
Linux Magazine content is made possible with support from readers like you. Please consider contributing when you’ve found an article to be beneficial.

News
-
System76 Refreshes Meerkat Mini PC
If you're looking for a small form factor PC powered by Linux, System76 has exactly what you need in the Meerkat mini PC.
-
Gnome 48 Alpha Ready for Testing
The latest Gnome desktop alpha is now available with plenty of new features and improvements.
-
Wine 10 Includes Plenty to Excite Users
With its latest release, Wine has the usual crop of bug fixes and improvements, along with some exciting new features.
-
Linux Kernel 6.13 Offers Improvements for AMD/Apple Users
The latest Linux kernel is now available, and it includes plenty of improvements, especially for those who use AMD or Apple-based systems.
-
Gnome 48 Debuts New Audio Player
To date, the audio player found within the Gnome desktop has been meh at best, but with the upcoming release that all changes.
-
Plasma 6.3 Ready for Public Beta Testing
Plasma 6.3 will ship with KDE Gear 24.12.1 and KDE Frameworks 6.10, along with some new and exciting features.
-
Budgie 10.10 Scheduled for Q1 2025 with a Surprising Desktop Update
If Budgie is your desktop environment of choice, 2025 is going to be a great year for you.
-
Firefox 134 Offers Improvements for Linux Version
Fans of Linux and Firefox rejoice, as there's a new version available that includes some handy updates.
-
Serpent OS Arrives with a New Alpha Release
After months of silence, Ikey Doherty has released a new alpha for his Serpent OS.
-
HashiCorp Cofounder Unveils Ghostty, a Linux Terminal App
Ghostty is a new Linux terminal app that's fast, feature-rich, and offers a platform-native GUI while remaining cross-platform.