Sync Tomboy Notes with Ubuntu One

Productivity Sauce
Ubuntu One may not be as popular or feature-rich as Dropbox, but the file synchronization service bundled with Ubuntu has one nifty feature that makes it a handy tool -- the ability to synchronize Tomboy notes across multiple machines. To make use of this feature, you have to enable and configure the synchronization options in each instance of Tomboy. To do this, launch Tomboy, right-click on its icon in the gnome panel, and choose Preferences. Switch to the Synchronization section, select Tomboy Web from the Service drop-down list, and press the Connect button. Authorize your machine with the Ubuntu One service, switch back to the Preferences window and press Save. Do the same on other machines running Tomboy. To sync notes manually, right-click on Tomboy's icon and choose Synchronize Notes. Alternatively, you can configure Tomboy to sync notes automatically by ticking the Automatically Sync in Background Every check box and specifying the desired time interval. That's all there is to it.
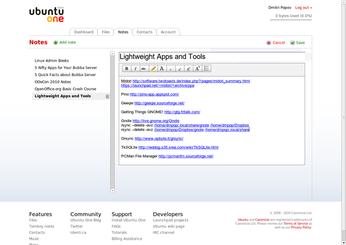
Now, the clever part is that you can view and manage your notes not only on every machine running Tomboy, but also using Ubuntu One's Web interface. In the Notes section there, you can add new notes as well as view and edit existing ones; and the service automatically pushes the changes to all connected Tomboy instances.
Comments
comments powered by DisqusSubscribe to our Linux Newsletters
Find Linux and Open Source Jobs
Subscribe to our ADMIN Newsletters
Support Our Work
Linux Magazine content is made possible with support from readers like you. Please consider contributing when you’ve found an article to be beneficial.

News
-
OpenMandriva Lx 6.0 Available for Installation
The latest release of OpenMandriva has arrived with a new kernel, an updated Plasma desktop, and a server edition.
-
TrueNAS 25.04 Arrives with Thousands of Changes
One of the most popular Linux-based NAS solutions has rolled out the latest edition, based on Ubuntu 25.04.
-
Fedora 42 Available with Two New Spins
The latest release from the Fedora Project includes the usual updates, a new kernel, an official KDE Plasma spin, and a new System76 spin.
-
So Long, ArcoLinux
The ArcoLinux distribution is the latest Linux distribution to shut down.
-
What Open Source Pros Look for in a Job Role
Learn what professionals in technical and non-technical roles say is most important when seeking a new position.
-
Asahi Linux Runs into Issues with M4 Support
Due to Apple Silicon changes, the Asahi Linux project is at odds with adding support for the M4 chips.
-
Plasma 6.3.4 Now Available
Although not a major release, Plasma 6.3.4 does fix some bugs and offer a subtle change for the Plasma sidebar.
-
Linux Kernel 6.15 First Release Candidate Now Available
Linux Torvalds has announced that the release candidate for the final release of the Linux 6.15 series is now available.
-
Akamai Will Host kernel.org
The organization dedicated to cloud-based solutions has agreed to host kernel.org to deliver long-term stability for the development team.
-
Linux Kernel 6.14 Released
The latest Linux kernel has arrived with extra Rust support and more.


replica watches
http://www.rolexclassic.com/Classic_Watches/84/2248.Html
http://www.rolexclassic.com/Classic_Watches/111/445.Html
http://www.rolexclassic.com/Classic_Watches/111/444.Html
http://www.rolexclassic.com/Classic_Watches/111/442.Html
http://www.rolexclassic.com/Classic_Watches/116/543.Html
tomboy and U1
nice