Use Google Refine to Massage Your Data

Productivity Sauce
Google Refine is an immensely powerful tool for dealing with "messy" data, and it sports a myriad of advanced features for massaging and analyzing complex data sets. However, that doesn't mean Google Refine can't be used to solve more mundane problems.
Of course, before you can put Google Refine to some use, you have to install it. First off, make sure that the Java Runtime Environment is installed on your machine. Grab then the latest version of Google Refine from the project's Web site and unpack the downloaded .tar.gz archive. In the terminal, switch to the resulting directory and start the application using the following commands:
cd google-refine
./refine
This starts the application and automatically opens it in the default browser.
To see what you can accomplish with Google Refine, let's take a look at a real world example. If you, like me, are an avid book reader and Kindle 3 user, you might have hundreds of highlights stored in the My Clipping.txt file. Having all the highlights in a single text file is not very practical, so it would be great to convert data in the My Clipping.txt file into a tab-separated format, so you can import them into a database. The problem is that the data in the My Clipping.txt file is not particularly well structured. Here, take a look at how highlights are stored in the file:
The Shallows: What the Internet Is Doing to Our Brains (Nicholas Carr)
- Highlight Loc. 2106-9  | Added on Saturday, October 23, 2010, 11:24 PM

It is the very fact that book reading “understimulates the senses” that makes the activity so intellectually rewarding.
By allowing us to filter out distractions, to quiet the problem-solving functions of the frontal lobes, deep reading
becomes a form of deep thinking. The mind of the experienced book reader is a calm mind, not a buzzing one.
When it comes to the firing of our neurons, it’s a mistake to assume that more is better.
==========
The Shallows: What the Internet Is Doing to Our Brains (Nicholas Carr)
- Highlight Loc. 2117-18  | Added on Saturday, October 23, 2010, 11:26 PM

If working memory is the mind’s scratch pad, then long-term memory is its filing system.
==========
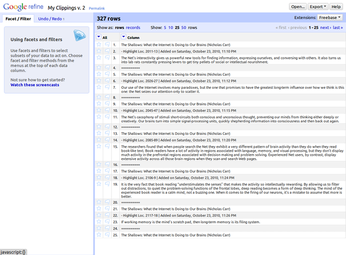
This is where Google Refine can come in rather handy, allowing you to massage the data into a usable form with a minimum of effort. Here's how it works. Start with creating a new project in Google Refine. Choose the My Clipping.txt file as the project's data file, untick the Split into columns check box, set Header lines to 0, and press the Create Project button. This creates a new project, where each entry in the My Clipping.txt file is treated as a separate row.
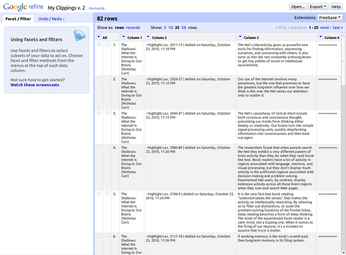
Fortunately, Google Refine provides an elegant way of turning rows into columns. Click on the menu next to the Column entry and choose the Transpose | Cell in rows into columns command. When prompted, specify the number of rows you want to transpose (in this case, it's 4), and press OK. Google Refine then processes the rows and moves them into the appropriate columns. The hardest part is over, and there are just a few simple things left for you to do.
Obviously, Column 4 is useless, so you can safely delete it using the Edit Column | Remove this column command. It also makes sense to give the columns more descriptive names, which can be done using the Edit Column | Rename this column command. And you can rearrange columns using the Edit Column | Move column to beginning / Move column to end / Move column left / Move column right commands. Finally, you can use the Export button to save the massaged data in a variety of formats.
Comments
comments powered by DisqusSubscribe to our Linux Newsletters
Find Linux and Open Source Jobs
Subscribe to our ADMIN Newsletters
Support Our Work
Linux Magazine content is made possible with support from readers like you. Please consider contributing when you’ve found an article to be beneficial.

News
-
Ubuntu 25.04 Coming Soon
Ubuntu 25.04 (Plucky Puffin) has been given an April release date with many notable updates.
-
Gnome Developers Consider Dropping RPM Support
In a move that might shock a lot of users, the Gnome development team has proposed the idea of going straight up Flatpak.
-
openSUSE Tumbleweed Ditches AppArmor for SELinux
If you're an openSUSE Tumbleweed user, you can expect a major change to the distribution.
-
Plasma 6.3 Now Available
Plasma desktop v6.3 has a couple of pretty nifty tricks up its sleeve.
-
LibreOffice 25.2 Has Arrived
If you've been hoping for a release that offers more UI customizations, you're in for a treat.
-
TuxCare Has a Big AlmaLinux 9 Announcement in Store
TuxCare announced it has successfully completed a Security Technical Implementation Guide for AlmaLinux OS 9.
-
First Release Candidate for Linux Kernel 6.14 Now Available
Linus Torvalds has officially released the first release candidate for kernel 6.14 and it includes over 500,000 lines of modified code, making for a small release.
-
System76 Refreshes Meerkat Mini PC
If you're looking for a small form factor PC powered by Linux, System76 has exactly what you need in the Meerkat mini PC.
-
Gnome 48 Alpha Ready for Testing
The latest Gnome desktop alpha is now available with plenty of new features and improvements.
-
Wine 10 Includes Plenty to Excite Users
With its latest release, Wine has the usual crop of bug fixes and improvements, along with some exciting new features.


Dragging and dropping Columns is supported as well
Click the drop-down arrow on first column ALL --> Edit columns --> Reorder columns...
You then have a popup dialog box to drag and drop the columns themselves. Great for those datasets that have many, many columns to deal with.
And if you have too many columns and run into visibility hell, you can always "hide" columns using Collapse this column and then "unhide" all the columns with ALL --> View --> Expand all columns...