
Open source messaging middleware
RabbitMQ

© Lead Image © Tatiana Tushyna, 123RF.com
Connect multiple protocols and servers together on your IoT projects.
For Internet of Things (IoT) projects, there are a lot of different ways that sensors, devices, and client interfaces can be connected together. For many projects, using a simple Message Queue Telemetry Transport (MQTT) broker is all that you need. However, if you're trying to merge and build IoT projects that use both MQTT and Advanced Message Queue Protocol (AMQP), or you require a REST API, then you should take a look at RabbitMQ.
RabbitMQ [1] is an open source middleware solution that natively uses AMQP communications, but it has a good selection of plugins to support features like MQTT, MQTT WebSockets, HTTP REST API, and server-to-server communications (Figure 1).
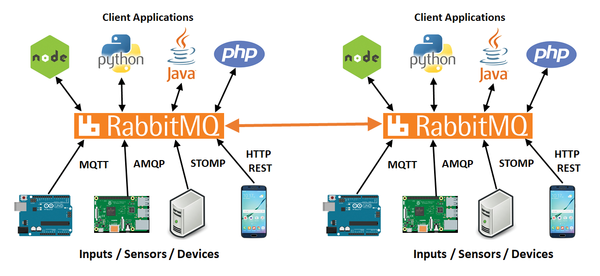 Figure 1: RabbitMQ overview.
In this article, I will set up a RabbitMQ server, and I will look at some of the differences between MQTT and AMQP messaging. Finally, an example of an Arduino MQTT message will be presented as both an MQTT and an AMQP item in a Node-RED dashboard.
Getting Started Locally
RabbitMQ can be installed on Windows, Linux, and macOS systems, and there are also some cloud-based offerings. For small systems, lower-end hardware like a Raspberry Pi can be used. Complete RabbitMQ installation instructions are available online [2]. To install and run RabbitMQ on an Ubuntu system, enter:
sudo apt-get update
sudo apt-get install rabbitmq-server
sudo service rabbitmq-server start
The next step is to add some plugins. For my project, I loaded the MQTT and web administration plugins:
sudo rabbitmq-plugins enable rabbitmq_mqtt
sudo rabbitmq-plugins enable rabbitmq-management
The rabbitmqctl command-line tool allows you to configure and review the RabbitMQ server. To add a user (admin1) with a password (admin1) that has config, write, and read rights for management and administrator access, enter:
sudo rabbitmqctl add_user admin1 admin1
sudo rabbitmqctl set_permissions -p / admin1 ".*" ".*" ".*"
sudo rabbitmqctl set_user_tags admin1 management administrator
After you've defined an administrative user, the RabbitMQ web management plugin can be accessed at http://ip_address:15672 (Figure 2).
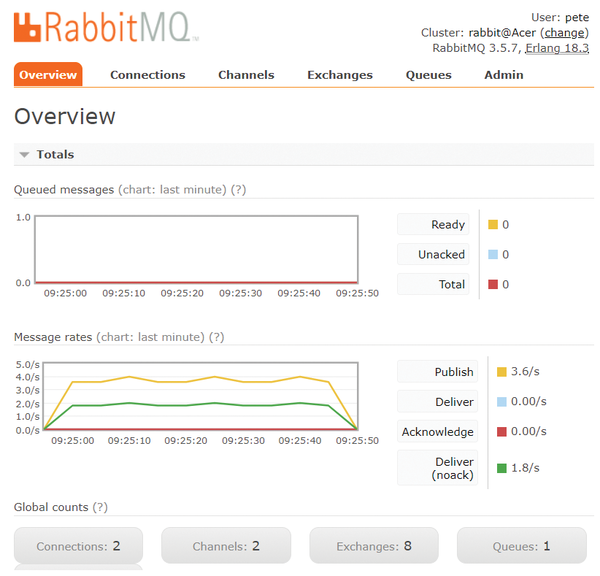 Figure 2: RabbitMQ web administration.
The RabbitMQ web management tool offers an overview of the present system load, connections, exchanges, and queues.
The RabbitMQ web management tool is excellent for small manual changes. However if you are looking at a doing a large number of additions or changes, then rabbitmqadmin, you can use the command-line management tool. Install the tool by entering:
# Get the cli and make it available to use.
wget http://127.0.0.1:15672/cli/rabbitmqadmin
sudo chmod +x rabbitmqadmin
Comparing MQTT and AMQP
It's useful to comment about some of the differences between MQTT and AMQP.
MQTT is a lightweight publish- and subscribe-based messaging protocol that works well with lower-end hardware and limited bandwidth. For Arduino-type applications where you only need to pass some sensor data, MQTT is an excellent fit.
AMQP has more overhead than MQTT, because it is a more advanced protocol that includes message orientation, queuing, routing, reliability, and security. Presently, there are no mainstream AMQP Arduino libraries, but numerous programming options for Raspberry Pi, Linux, Windows, and macOS systems exist. An AMQP IoT example would be to send sensor failures and alarms to dedicated maintenance and alarm queues.
MQTT and AMQP Queues
One of the biggest differences in queues is that MQTT queues are designed to show you the last available message, where as AMQP will store multiple messages in a queue.
A published MQTT message contains a message body, a retain flag, and a quality of service (QoS) value.
An AMQP message can be published with added properties, such as time stamp, type of message, and expiration information. AMQP messages also support the addition of custom header values. Listing 1 is a Python publish example that defines the message type to be "Pi Sensor", and it includes custom headers for status and alarm state.
Listing 1
Python AMQP Publish Example
01 #!/usr/bin/env python
02 import pika
03
04 node = "192.168.0.121"
05 user = "pete"
06 pwd = "pete"
07
08 # Connect to a remote AMQP server with a username/password
09 credentials = pika.PlainCredentials(user, pwd)
10 connection = pika.BlockingConnection(pika.ConnectionParameters(node,
11         5672, '/', credentials))
12 channel = connection.channel()
13
14 # Create a queue if it doesn't already exist
15 channel.queue_declare(queue='Rasp_1',durable=True)
16
17 # Define the properties and publish a message
18 props = pika.BasicProperties(
19     headers= {'status': 'Good Quality',"alarm":"HI"},
20     type ="Pi Sensor")
21 channel.basic_publish(exchange='',
22     routing_key='Rasp_1',body='99.5', properties = props)
23
24 connection.close()
The results from the Listing 1 example can be examined using the Queue | Get Message option in the RabbitMQ web management interface (Figure 3).
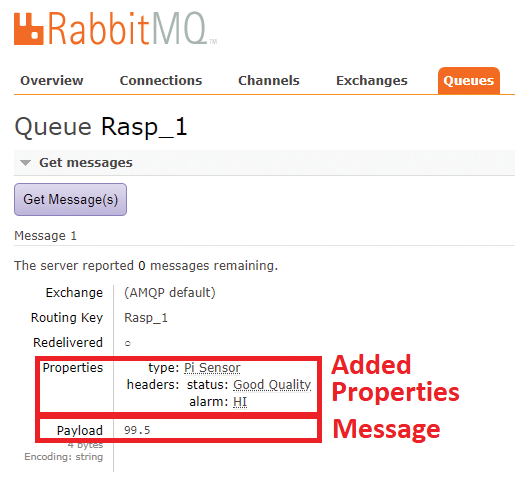 Figure 3: AMQP queue with custom properties.
Buy this article as PDF
(incl. VAT)
Buy Linux Magazine
US / Canada
UK / Australia
Subscribe to our Linux Newsletters
Find Linux and Open Source Jobs
Subscribe to our ADMIN Newsletters
Support Our Work
Linux Magazine content is made possible with support from readers like you. Please consider contributing when you’ve found an article to be beneficial.

News
-
Gnome OS Adopting systemd-sysupdate
Gnome OS is about to undergo a major under-the-hood change that promises enhanced security.
-
Endless OS 6 has Arrived
After more than a year since the last update, the latest release of Endless OS is now available for general usage.
-
Fedora Asahi 40 Remix Available for Macs with Apple Silicon
If you've been anticipating KDE's Plasma 6 for your Apple Silicon-powered Mac, then you're in luck.
-
Red Hat Adds New Deployment Option for Enterprise Linux Platforms
Red Hat has re-imagined enterprise Linux for an AI future with Image Mode.
-
OSJH and LPI Release 2024 Open Source Pros Job Survey Results
See what open source professionals look for in a new role.
-
Proton 9.0-1 Released to Improve Gaming with Steam
The latest release of Proton 9 adds several improvements and fixes an issue that has been problematic for Linux users.
-
So Long Neofetch and Thanks for the Info
Today is a day that every Linux user who enjoys bragging about their system(s) will mourn, as Neofetch has come to an end.
-
Ubuntu 24.04 Comes with a “Flaw"
If you're thinking you might want to upgrade from your current Ubuntu release to the latest, there's something you might want to consider before doing so.
-
Canonical Releases Ubuntu 24.04
After a brief pause because of the XZ vulnerability, Ubuntu 24.04 is now available for install.
-
Linux Servers Targeted by Akira Ransomware
A group of bad actors who have already extorted $42 million have their sights set on the Linux platform.