
Mining the Monero cryptocurrency the CLI way
Mini Miner

© Lead Image © Chode, 123RF.com
The Monero cryptocurrency lets you get in the game without spending thousands on hardware. We'll show you how.
When I started mining Bitcoin 13 years ago, the hardware standard was a bunch of Windows computers built up around the best possible video cards and power supplies. The end goal was to achieve the most hashes per second (H/s, or sometimes expressed as kH/s or mH/s) [1]. To this day, it is easy to find articles explaining how to mine Bitcoin using this classic setup. But few of the mining tools are command-line based, which is a problem for Linux veterans who wish to avoid GUI clutter. But rest assured: A basic Debian system, with the fastest CPU you can get your hands on, is all you need to start mining cryptocurrencies.
In the highly competitive universe of crypto mining, major currencies like Bitcoin are typically mined using specially built Application-Specific Integrated Circuit (ASIC) systems, which require a significant investment of the miner's time and money.
Alternative currencies offer a lower barrier of entry. One alternative cryptocurrency that has gained some recent attention is Monero (abbreviated XMR). Monero stands out because it is truly anonymous [2] and because of its resistance to ASIC hardware mining [3]. This article describes how to start mining XMR on a Debian-based Linux system.
A Little Bit More on XMR
The value of Monero is nowhere near the range of Bitcoin's value. The price of XMR at the time I wrote this article was $142.30, whereas the price of Bitcoin was $25,851.07. Some have wondered whether XMR would ever reach the value of BTC, but since its inception in 2014, it has failed to even reach the $500 mark [4]. However, projections are looking solid, and Monero shouldn't disappear any time soon.
Technical Requirements
The most important asset for mining cryptocurrencies is electricity. The second most important asset is a fast CPU chip [5] that you can overclock. You'll also need a means for dissipating the heat and keeping your environment dust free. Because mining is a process that never sleeps and demands full capacity, it will be important to leave room for your hardware to remain in a cool, friendly zone for the time it will be crunching its life away. While it does, and if it runs as dedicated, it will emit a vast quantity of heat. The final factor affecting hashing performance is the clock speed of the RAM, although the RAM speed is less important than the other features I've mentioned.
A minimal system for mining XMR would have a 250GB SSD, 4GBs of RAM, and the cheapest video card available. The high-grade components need to be the CPU and the power supply unit. Investing in a good motherboard is optional yet vital if you wish for your system to beat the clock. Be advised that, as time goes on, the size of the decentralized blockchain copy that you'll need to host locally will eventually expand to over 250GB. Currently, it weighs about 164GB, so it is safe to say that a 250GB drive will hold for another three to four years at the very least – unless there is a huge increase in transactions.
Getting Started
The first step is to get the system up. For that, you'll need to install the latest Debian (bookworm) [6]. All you really need is the SSH server and standard system utilities from the latest Debian netinstall (Figure 1).
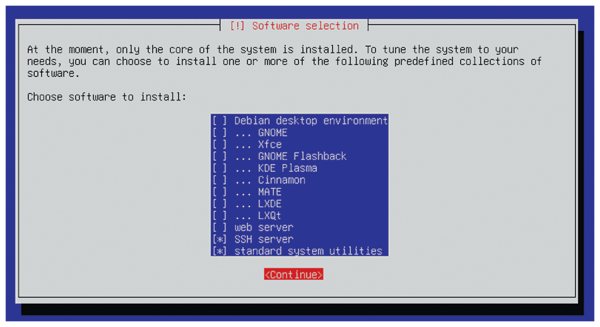 Figure 1: You'll need SSH and the standard system utilities.
Once you've installed the OS and logged into the freshly installed system, the work with Monero can begin. Start by downloading the latest Monero daemon [7] and extracting it under the folder of your choice (Figure 2). Then install the CPU miner (Figure 3).
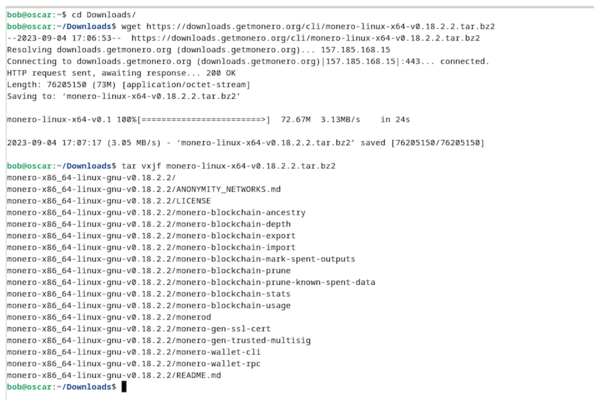 Figure 2: Monero v0.18.2.2 is the latest current version; it contains both the daemon and the wallet binaries that are pivotal to mining Monero.
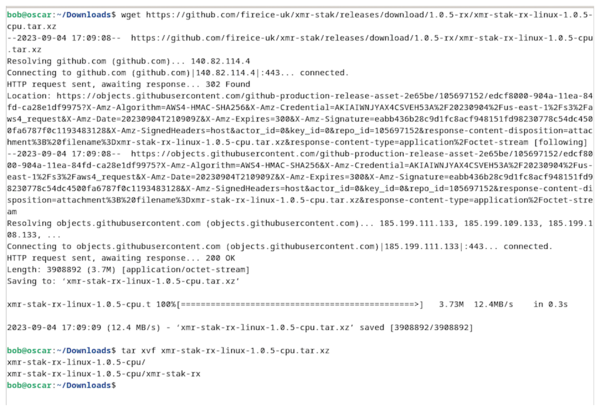 Figure 3: Even if last the update dates back to 2020, xmr-stak is still one of the best cross-platform CPU miners for XMR.
The next steps truly initiate the Monero footprint. The very first thing is to download the ~164Gbs blockchain, and for that, a simple execution of ./monerod will handle the task (Figure 4).
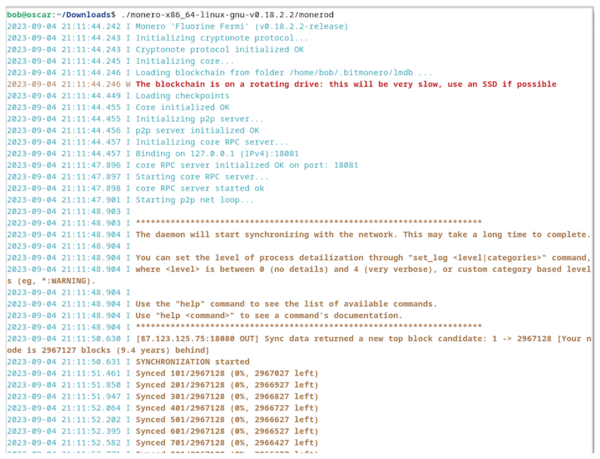 Figure 4: Downloading the blockchain with monerod.
Launching the monerod command without an existing blockchain in your home folder will result in it downloading the entire blockchain. This process will take a while – and even longer if you are working with a slow hard drive. Alternatively, specifying
--data-dir /path/of/.bitmonero
will simply download the delta since last update. That way you can always back up your downloaded blockchain every now and then, in order to avoid all this synchronization.
Whatever you attempt to do while the blockchain finishes updating could end up not working immediately. Therefore the wisest thing to do is to allow it to complete. However, this process will take several hours and can take days, depending on your Internet connection.
By default monerod puts everything blockchain related under /home/youruser/.bitmonero. The last operation is to port forward TCP/18081 if you wish to have no errors, but those errors will not void some functions.
Even when you have already downloaded 99 percent of the blockchain and have not updated in 10 days, it can take up to an hour for your node to be synchronized again. Because I am living dangerously, I will proceed immediately with the next step: setting up a wallet (Figure 5). In this case, I'll be running
~/Downloads/monero-x86_64-linux-gnu-v0.18.2.2/monero-wallet-cli
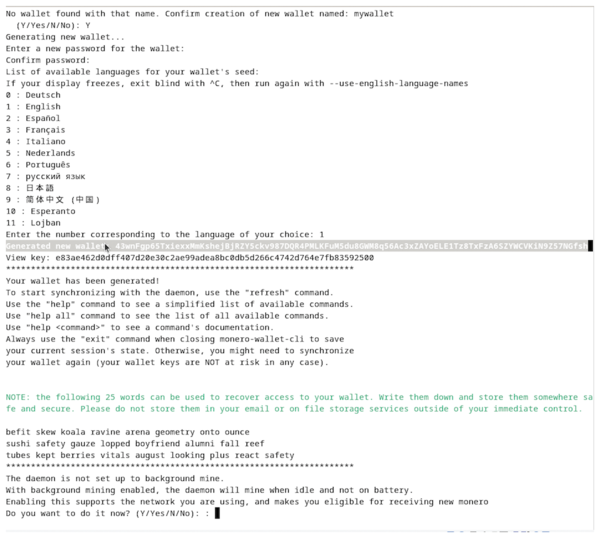 Figure 5: You'll need to set up a wallet.
Upon first launch you are asked to create a wallet, secure it via a password, and then configure it. Then you are handed a 96-character alphanumerical expression that represents the actual wallet address used for all of your future transactions. You are also provided with 25 words that can be used to recover access to your wallet. Update your password manager with that information and take really good care of it!
At the end of the creation process, you will see your balance and can start making transfers, as long as the node is in sync with the Monero network. In the event that everything went smoothly, there will be two mywallet files under pwd.
The next step is setting up the miner, which you simply execute and answer a couple of questions. After you choose the desired currency, pool address, and wallet address, the system gives the infamous "MEMORY ALLOC FAILED" (Figure 6), but you can fix that right now.
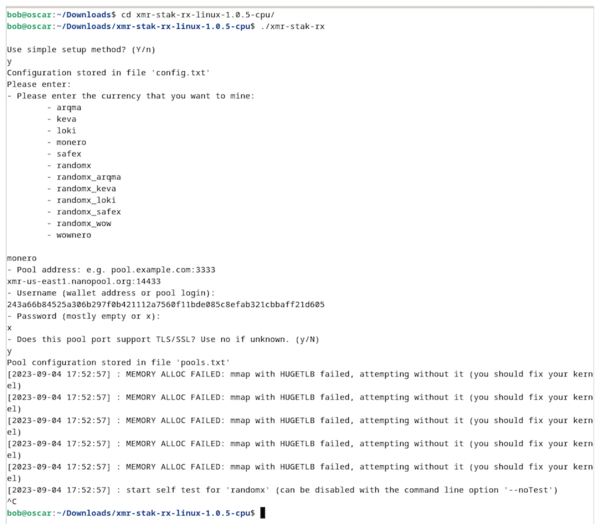 Figure 6: Questions answered, but you'll need to make some changes before the miner is error free.
Buy this article as PDF
(incl. VAT)
Buy Linux Magazine
US / Canada
UK / Australia
Subscribe to our Linux Newsletters
Find Linux and Open Source Jobs
Subscribe to our ADMIN Newsletters
Support Our Work
Linux Magazine content is made possible with support from readers like you. Please consider contributing when you’ve found an article to be beneficial.

News
-
OSJH and LPI Release 2024 Open Source Pros Job Survey Results
See what open source professionals look for in a new role.
-
Proton 9.0-1 Released to Improve Gaming with Steam
The latest release of Proton 9 adds several improvements and fixes an issue that has been problematic for Linux users.
-
So Long Neofetch and Thanks for the Info
Today is a day that every Linux user who enjoys bragging about their system(s) will mourn, as Neofetch has come to an end.
-
Ubuntu 24.04 Comes with a “Flaw"
If you're thinking you might want to upgrade from your current Ubuntu release to the latest, there's something you might want to consider before doing so.
-
Canonical Releases Ubuntu 24.04
After a brief pause because of the XZ vulnerability, Ubuntu 24.04 is now available for install.
-
Linux Servers Targeted by Akira Ransomware
A group of bad actors who have already extorted $42 million have their sights set on the Linux platform.
-
TUXEDO Computers Unveils Linux Laptop Featuring AMD Ryzen CPU
This latest release is the first laptop to include the new CPU from Ryzen and Linux preinstalled.
-
XZ Gets the All-Clear
The back door xz vulnerability has been officially reverted for Fedora 40 and versions 38 and 39 were never affected.
-
Canonical Collaborates with Qualcomm on New Venture
This new joint effort is geared toward bringing Ubuntu and Ubuntu Core to Qualcomm-powered devices.
-
Kodi 21.0 Open-Source Entertainment Hub Released
After a year of development, the award-winning Kodi cross-platform, media center software is now available with many new additions and improvements.