
Access Your Apps and Docs Remotely with FreeNX

Productivity Sauce
The ability to control your primary machine remotely can come in rather handy when you need to access your documents and applications using your netbook or laptop. While you might be tempted to go with a solution based on the popular VNC protocol, you should keep in mind that it has two serious limitations: it's both insecure and slow. A much better solution is to use the FreeNX server and an NX client, which offers a secure connection that works well even with a slow modem link -- a boon for users on the move.
The first order of business is to install the FreeNX server software on your primary machine. To do this on Ubuntu, you have to add the FreeNX Team PPA repository to the sources.list file. Open the file for editing using the sudo nano /etc/apt/sources.list command and add the following lines to it:
deb http://ppa.launchpad.net/freenx-team/ubuntu VERSION main
deb-src http://ppa.launchpad.net/freenx-team/ubuntu VERSION main
Replace the VERSION string with the actual Ubuntu version installed on your machine (e.g., "jaunty" for Ubuntu 9.04). Save the modifications and close the file. Next, add the public key of FreeNX PPA using the following command:
sudo apt-key adv --recv-keys --keyserver keyserver.ubuntu.com 2a8e3034d018a4ce
Update the repository info and install the FreeNX server:
sudo apt-get update && sudo apt-get install freenx
Run then the nxsetup utility to install and configure the server:
sudo /usr/lib/nx/nxsetup --install
The setup procedure automatically starts the FreeNX server, but you can always stop and start the server manually using the following commands:
sudo /etc/init.d/freenx-server stop
sudo /etc/init.d/freenx-server start
Once the server is up and running, it's time to install NX client software on your netbook or laptop. To do this, use the sudo apt-get install qtnx command which installs the QtNX NX client.
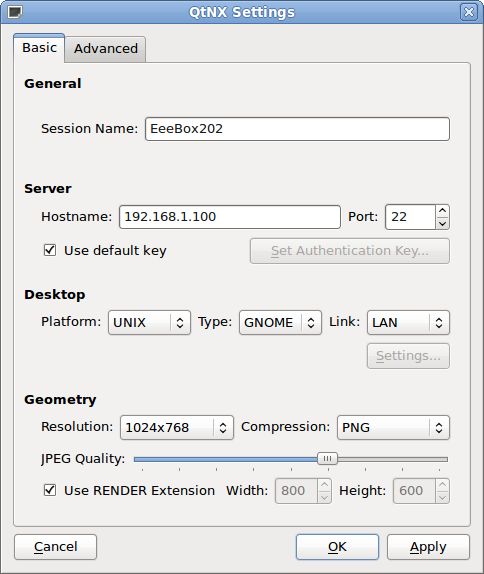
Launch QtNX, and select Create new session from the Session drop-down list to set up a new session. Most of the fields in the configuration window are self-explanatory, so you shouldn't have any problems configuring the session. Press OK when you are done, enter your user name and password of the user account on the remote host, hit the Connect button, and you should see the remote desktop in all its beauty.
Comments
comments powered by DisqusSubscribe to our Linux Newsletters
Find Linux and Open Source Jobs
Subscribe to our ADMIN Newsletters
Support Our Work
Linux Magazine content is made possible with support from readers like you. Please consider contributing when you’ve found an article to be beneficial.

News
-
Fedora Asahi 40 Remix Available for Macs with Apple Silicon
If you've been anticipating KDE's Plasma 6 for your Apple Silicon-powered Mac, then you're in luck.
-
Red Hat Adds New Deployment Option for Enterprise Linux Platforms
Red Hat has re-imagined enterprise Linux for an AI future with Image Mode.
-
OSJH and LPI Release 2024 Open Source Pros Job Survey Results
See what open source professionals look for in a new role.
-
Proton 9.0-1 Released to Improve Gaming with Steam
The latest release of Proton 9 adds several improvements and fixes an issue that has been problematic for Linux users.
-
So Long Neofetch and Thanks for the Info
Today is a day that every Linux user who enjoys bragging about their system(s) will mourn, as Neofetch has come to an end.
-
Ubuntu 24.04 Comes with a “Flaw"
If you're thinking you might want to upgrade from your current Ubuntu release to the latest, there's something you might want to consider before doing so.
-
Canonical Releases Ubuntu 24.04
After a brief pause because of the XZ vulnerability, Ubuntu 24.04 is now available for install.
-
Linux Servers Targeted by Akira Ransomware
A group of bad actors who have already extorted $42 million have their sights set on the Linux platform.
-
TUXEDO Computers Unveils Linux Laptop Featuring AMD Ryzen CPU
This latest release is the first laptop to include the new CPU from Ryzen and Linux preinstalled.
-
XZ Gets the All-Clear
The back door xz vulnerability has been officially reverted for Fedora 40 and versions 38 and 39 were never affected.
Printing support