Organize your Finances with KMyMoney
Tutorial – KMyMoney
Looking for software to help you manage your money? The personal finance program KMyMoney can help you track income and expenses and better plan your financial future.
If you are looking to keep track of your finances, improve your financial planning, and discover potential savings, it's essential to accurately track your assets and expenses. KMyMoney [1], a KDE financial management program, is designed to make this process easier. While it is primarily aimed at individuals tracking their personal finances, it may also be useful for some smaller commercial enterprises and associations.
As of this writing, the latest version of KMyMoney is 5.0.7. It runs not just on KDE Plasma, but also on Gnome (e.g., on Ubuntu). The program sources are available for download from the KDE website. The commands from Listing 1 allow you to install KMyMoney below /opt/ in a terminal window. This relies on CMake [2], which most popular distributions preinstall, but you may need to install it first depending on your system.
Listing 1
Install KMyMoney
$ wget https://download.kde.org/stable/kmymoney/5.0.7/src/kmymoney-5.0.7.tar.xz
$ tar xf kmymoney-5.0.7.tar.xz
$ cd kmymoney-5.0.7
$ mkdir build
$ cd build
$ cmake.. -DCMAKE_INSTALL_PREFIX=/opt
$ make
$ sudo make install
On Ubuntu, you can set up KMyMoney in a terminal window using the command:
sudo apt install kmymoney
After the installation, you can either click on a shortcut, or you can launch the program with the kmymoney shell command.
Setup Wizard
KMyMoney has a detailed user manual [3], as well as a mailing list [4] and forum [5]. The first time you start KMyMoney, a wizard guides you through the program setup. Start by entering your personal data, decide on a currency, and enter the data for your checking account. Next, select the types of accounts and categories you want the program to create (Figure 1).
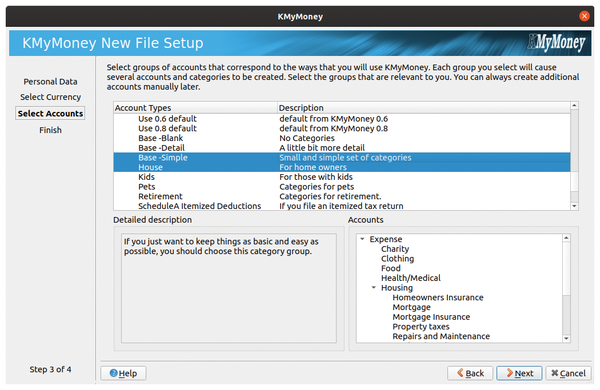 Figure 1: Thanks to the setup wizard, you can create a new file quickly and easily, choosing from a variety of templates.
Many individuals will get by with a simple system and are well served with a selection from the Base section. If applicable, you can add further account types, such as accounts designed for homeowners. Decide on the basics here first; you will adjust the account specifics later on in the program. Finally, specify a name and location for the KMyMoney file. Clicking on Finish completes the setup.
Importing Data
If you have been tracking your finances with another program, you can transfer the existing data to KMyMoney using File | Import. The program can read GnuCash files [6], as well as the common QIF, OFX, and QFX formats, typically without too much trouble.
To protect your data against unwanted access, you can encrypt your KMyMoney file with GnuPG [7]. To do this, use the same key pair that you use to encrypt your emails. You can set up encryption via Settings | Configure KMyMoney. In the dialog, go to Encryption and check the box to use GPG encryption. In the Your Key selection menu, KMyMoney lists all the GnuPG keys that are set up on the system. You can choose the one that suits you best from the list.
Below this, you will find an entry for additional keys. This is where KMyMoney lets you add more GnuPG keys and thus use the KMyMoney recovery function [8]. For this purpose, the developers have stored a public key on the project page, which you can store as a secondary key in the program if required. If you lose your own key pair one day, or forget the password, you can send your KMyMoney file to the developers who will decrypt it for you.
Overview and Accounts
Upon start up, a summary of your finances appears (Figure 2). You can decide which information is displayed in the overview via Settings | Configure KMyMoney. Among other things, you will find an overview of your existing accounts (assets and liabilities) on the start screen. KMyMoney also calculates your net worth (i.e., all your assets added up after deducting all liabilities).
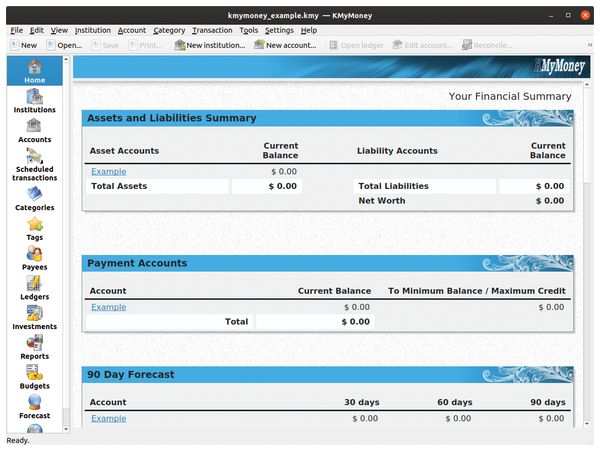 Figure 2: Once you've set up KMyMoney, you'll see an overview of your current finances each time you start the program.
To ensure that the accounts contain the correct values, you first need to enter the opening balance of each account. To do this, click on the Accounts icon in the left sidebar. Accounts are grouped by type (e.g., you will find the Savings account listed as a type of Asset). After right-clicking on the account, select Edit Account from the context menu.
A new window opens with the account details. In the General tab, you will find the field for the account balance. In Type, you can specify whether the account is a checking, savings, or other type of account. Checking Preferred Account adds the account to an overview on the home screen, so that you can see the account balance directly. The Institution tab lets you enter details such as the International Bank Account Number (IBAN) code for a bank account. The Hierarchy tab lets you determine where the account will appear within the account overview.
The Limits tab also has useful tools. You can set a minimum balance to have KMyMoney display a warning if the account balance drops below this amount, .
The Tax tab is useful for business owners. Check VAT account if your business pays sales tax. Also, selecting Include on Tax Reports is only required for business accounts. For personal finance, not all account records are relevant for your taxes. You can therefore determine later on in the individual categories what you want to appear in the tax report. Click on OK to save the settings and return to the account overview.
Delete any unnecessary account subcategories to keep the account easy to manage. You also can add more accounts if needed. This will give you an overview of your checking account, savings account, cash and securities accounts, credit cards, and loans.
After you have entered all the opening balances of your existing accounts, KMyMoney will calculate the future account balance based on the transactions you record. For example, when you pay a credit installment, the balance in your checking account and the liability in the credit account will decrease. If you withdraw money at an ATM, the balance in your checking account will decrease, but the amount of cash will increase.
Track Investments
Securities accounts are a special case in the investment accounts group. Their value not only rises or falls when you buy or sell assets like stocks or bonds but also due to price fluctuations. For this reason, keeping track of your securities is a little more complicated, but KMyMoney always provides an up-to-date overview of the value of your securities accounts.
You will need to enter a lot of details about your securities investments. To do this, switch to Investments in the left sidebar and then Select Account. After right-clicking on what is still an empty overview below this, select New investment. This launches the New Investment wizard, where you fill in the fields to name and describe the new security (Figure 3). Pressing Finish completes the wizard.
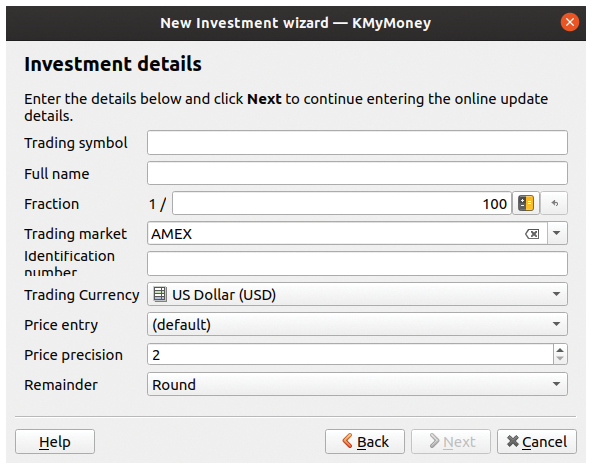 Figure 3: Entering investment data is somewhat more complex, but you will be rewarded with a precise overview of your assets.
You will need to enter the quantity and price of your securities. Click on Ledgers in the overview on the left and select the desired securities account in the top left drop-down menu. After right clicking on what is still an empty overview, choose New. Under Activity, choose Add shares to enter your share portfolio. You can also indicate when you are buying or selling shares.
In the Securities tab, select the security you just entered data for as described above, and then add the number of units you hold in your securities account. To enter the current security price, go back to Investments in the sidebar on the left. There you will see an overview of your securities; now the quantity will also appear there. After right clicking on a security, you can then add the price. You can choose to add the price either manually or to retrieve the price from the Internet.
Income and Expenses
After completing the setup phase, you can start recording transactions. Now the income and expense accounts come into play. KMyMoney calls these accounts, which you can find in the left sidebar, Categories. For example, categories might include food expenses or freelance writing income. It makes sense to first browse through the list and remove categories that you do not need as well as adding categories that you are missing. You can also edit the categories here.
You can assign a new name or move the position of the category within the account framework. Business owners will also want to specify which categories are relevant for sales tax. This means that KMyMoney only posts the net amount to the category and automatically assigns the tax amount to the category for sales tax. You also decide whether a category should appear in the tax report. Create separate categories for income-related expenses and donations and tell KMyMoney to include them in the tax report. In this way you have all the data you need for your income tax return at your fingertips.
Posting Transactions
To post a new transaction, click on Ledgers in the left sidebar. When you get there, choose the right account in the selection menu above (e.g., Cash). You will now see an overview of all the postings for this account. Pressing Ctrl+Insert or selecting New in the context menu lets you post a new item. At the bottom of the window, the input fields for this new item now appear.
First decide whether this is a Deposit transaction (income), a Transfer (from one account to another; e.g., from a checking account to cash), or a Withdrawal (expense). For example, if you buy the current issue of this magazine at a newsstand, the latter would be the right choice. In the left sidebar, you create data records for who you are paying via the Payees item.
Unless you're running a business, you may want to simply leave this field empty instead of entering each individual payee. The appropriate expense account is entered in the Category field (Newspapers in this example). Now enter the Date and Amount; there is also space for a Memo. The Status item is only relevant for your bank accounts, where you store whether you have already reconciled your records with your bank statement.
KMyMoney also handles split transactions, (i.e., transactions where you assign a payment to several income or expense accounts). For example, if you have bought food, clothing, office supplies, and magazines at a single store and paid for them by credit card, only the total amount will appear on your credit card account. You need to split this between the appropriate expense accounts. To do this, proceed as described above, but leave the Category field empty at first and click on the small button to the right of it instead. A new dialog box opens in which you enter the different categories and their partial amounts (Figure 4).
 Figure 4: The split transaction feature allows you to record both the total amount of a credit card purchase and the breakdown of how much of it you spent on each category, such as food or clothing.
Online Banking
Ideally, you will not need to enter your bank account transactions manually, because you can retrieve them online. What is available will vary depending on your location and bank, as well as updates to the program, so start by referring to the KMyMoney user manuals [3]. At present, the program can be used for retrieving bank records.
Optionally, you can load your account statements into the program in CSV format. Many banks make this export function available to their customers in the web front end of their online banking programs. The CSV file can then be loaded into KMyMoney via File | Import | CSV.
Reports and Forecasts
KMyMoney rewards you for the effort you put into your accounting with an up-to-date and accurate overview of your finances, helping you improve your financial planning. To generate this detailed information, go to the left sidebar and select Reports. KMyMoney can show you what you have spent money on, helping you find opportunities to reduce costs. The program also provides reports on the status of your investments, from which you can derive recommendations for future investments.
Based on your past transactions, KMyMoney also generates a forecast of your future income and expenses. The tax report feature supports you with your tax return: All categories that you have previously flagged as tax-relevant, such as income-related expenses and donations, automatically appear in the tax report.
Conclusion
This article provides a basic overview of the huge feature set in KMyMoney. However, beginners will have to invest some time and effort: It is essential to familiarize yourself with the principles of accounting and the program and to categorize and record financial records. Once this hurdle has been overcome, KMyMoney presents itself as a clear and easy-to-use financial management program. The application's approach is based on managing your personal finances, but does not leave freelancers, smaller commercial enterprises, and associations out in the cold.
The good documentation on the project page and the mailing list, where you can get help if needed, are important resources.
Infos
- KMyMoney: https://kmymoney.org
- CMake: https://cmake.org
- KMyMoney user manuals: https://kmymoney.org/documentation.html
- KMyMoney mailing list: https://mail.kde.org/mailman/listinfo/kmymoney
- KMyMoney forum: https://forum.kde.org/viewforum.php?f=69
- GnuCash: https://www.gnucash.org
- "Neatly managing and handling PGP/GnuPG keyrings" by Frank Hofmann, Linux Magazine, issue 192, November 2016, pg. 68, https://www.linux-magazine.com/Issues/2016/192/GPG-Key-Management/
- Recovery function in KMyMoney: https://kmymoney.org/recovery.php
- KMyMoney User's Manuals: https://kmymoney.org/documentation.html