Turning old hardware into network storage
NAS for the Masses

© Photo by Duy Pham on Unsplash
EasyNAS lets you set up network-attached storage in next to no time – even on old hardware.
Do you have an old computer gathering dust? Thanks to Linux's flexibility and the innovative spirit of programmers, even computers that are more than 10 years old can still be used as network storage in current IT infrastructures.
Systems frequently used by power users in the past often offer plenty of space for mass storage. In addition, these systems usually have sufficient power supplies to run multiple hard disks as network-attached storage (NAS). EasyNAS, an openSUSE derivative, takes the pain out of configuring network storage with multiple storage media and integrating it into an existing LAN [1].
Requirements
EasyNAS comes as a hybrid ISO image with a size of about 380MB. As the minimum system requirements, the developers recommend a processor with at least 500MHz clock speed – as you may recall, this was state of the art more than 15 years ago.
A word of caution: Contrary to the original, not-yet-updated information about the hardware requirements, the current version, EasyNAS 1.0.0, requires a 64-bit processor. However, the older version 0.7.2 images available on SourceForge can also be used with 32-bit CPUs [2].
As a further requirement, the computer should have at least 1GB RAM, but 2GB or more is preferable for the system to run smoothly. The hard disk needs a capacity of at least 20GB.
The EasyNAS project does not state any further system requirements, but you will require a wired network connection for obvious reasons. EasyNAS lacks the ability to integrate with a network via WiFi. On a positive note, however, the system supports various transfer protocols. Network File System (NFS) can be used in Linux-only environments, while SMB or Samba is recommended for mixed environments.
Note that EasyNAS requires a dedicated storage area for itself. This is usually the first internal hard disk, which cannot be used for storage purposes as part of a network drive, either. Therefore, you need at least two physical mass storage devices to use the NAS system – or perhaps more depending on the desired RAID level.
Commissioning
On booting, the system first opens a GRUB screen where you can choose between installing EasyNAS or booting from the internal hard disk. The system does not support live operation.
To install EasyNAS on a mass storage device, the openSUSE derivative boots into an ncurses-based wizard. In the wizard, first select the disk on which you want to install the operating system. The installer then deletes all data on the disk, after giving you a fair warning, and does a disk check. Finally, the actual system installation takes place. The wizard then branches to a menu on the text console where you can access various administrative tasks by typing the listed numbers.
EasyNAS also enables a web server during the install, which means you complete the configuration using any web browser. To do this, call up the system's IP address in the browser, followed by a colon and the port number 1443 (e.g., 192.168.0.10:1443). This will take you to a login screen where – if you keep the administrator's credentials – you need to enter admin as the username and password at the prompt.
EasyNAS then opens a visually appealing and clearly arranged dashboard with icons that visualize the NAS system's technical configuration (Figure 1).
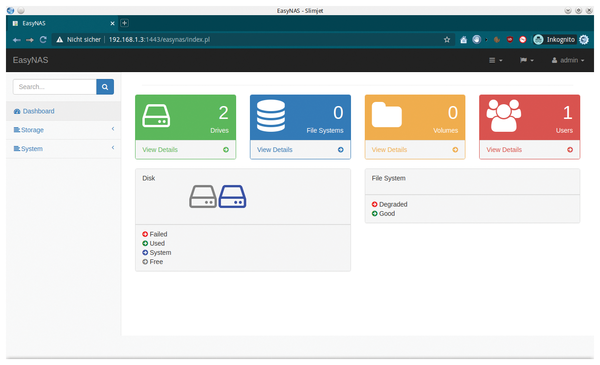 Figure 1: The EasyNAS dashboard clearly displays the NAS system's configuration.
Dashboard
Clicking on Drives in the dashboard lets you manage the mass storage devices that physically exist on the system. Drives also takes into account removable media, such as USB memory sticks, but not optical drives. Existing mass storage devices are displayed as symbols. Note that the EasyNAS system drive always appears in blue, and network drives are shown in green.
Next to Drives, File Systems summarizes the existing filesystems used for the NAS. To the right, Volumes contains logical drives, and Users displays the users logged into the system on the far right. To find out more information for each group, click on View Details.
After the install, File Systems and Volumes will be empty because you need to configure them first. Also, Users only contains the administrator.
On the left side of the dashboard, in the vertical sidebar, you will find Storage and System, which you will use to configure your new EasyNAS.
Configuration
To create a filesystem on the drives intended for the NAS as mass storage, first open Storage | File System Manager. After clicking on Create File System, a clear-cut dialog appears where you can assign a name to the filesystem, select the appropriate drive from a list of mass storage devices built into the system, and specify which RAID level you want to use for creating the drive (Figure 2).
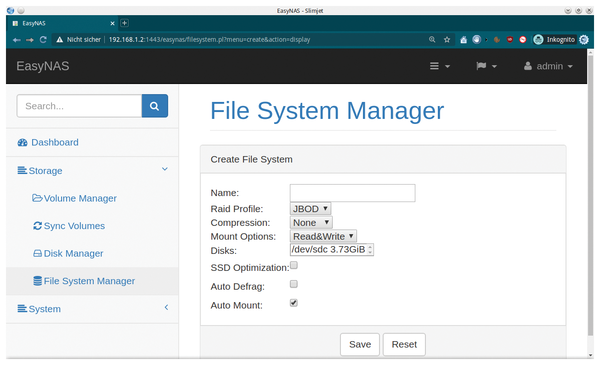 Figure 2: Creating new drives in the File System Manager.
In addition, you can set a compression level here and define how the NAS mounts the drive. It is important to note that when specifying the RAID level, if there is only one storage drive in the system, you must specify the JBOD level. Also, the filesystem name should be at least eight characters. To apply the settings, click Save. The system then confirms successful creation of a new filesystem.
Next, switch to Storage | Volume Manager and create a new volume. After clicking on Create Volume, a self-explanatory dialog appears that is limited to essential information. Because no users or groups exist initially, the administrator still appears in this dialog as the User Owner. If you created several filesystems in the first step, then specify the filesystem to be used for the volume in a selection field in this dialog. You also need to name the volume and, if applicable, assign permissions to manage access to it.
The basic setting activates read and write permissions for users, and the group only has read permission. If you create quotas, you also conveniently assign storage quotas in this dialog. After completing all the settings, press Save to save the new volume. Similar to creating a filesystem, the volume now appears in a list in the Volume Manager, which you can use to modify the settings later on if needed (Figure 3).
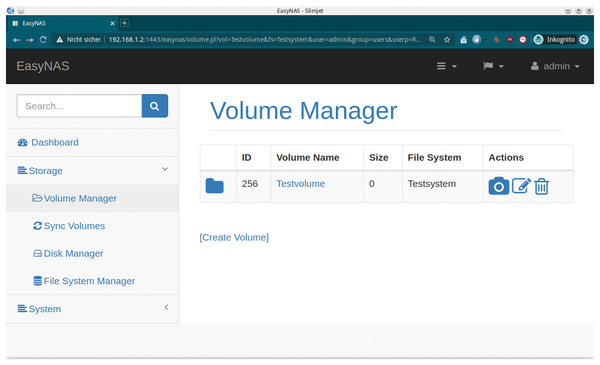 Figure 3: EasyNAS uses the same dialog design for all categories, like the dialog shown here for creating a volume.
Groups and Users
To use the memory quota sensibly and securely, you must create groups and users using System | Groups Manager and Users Manager respectively. Depending on which option you select, you will find the Create Group or Create User links, much like the drive settings. I recommend creating the groups first and then assigning the users to the groups by selecting the desired group in the corresponding selection field in the Create User dialog.
When creating a user, you can also define quotas and assign permissions. After completing the settings, press Add to create the group or user. The dashboard will then display the total number of logged-in users in Users. Clicking View Details under Users opens detailed information about the users in a table format. Under Actions, you can manage the entries, delete users, or modify their settings (Figure 4).
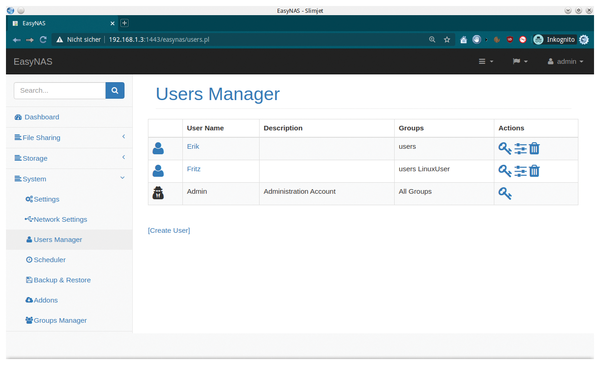 Figure 4: EasyNAS comes with a small but workable user management feature.
Access
To gain access to the NAS system's resources, the final step is to specify which access protocols you want to use. EasyNAS offers a total of eight different access modes, ranging from Apple's AFP protocol to CIFS/SMB, which is common in the Windows world. The SSH, NFS, and FTP protocols commonly used on Linux are also available.
You can enable support for the individual protocols under System | Addons, where you will find the individual options listed in a table in the File Sharing area. To integrate an option into the system, press the installation button on the right in the Actions column. EasyNAS now downloads the corresponding package from the Internet, integrates it, and then displays a confirmation message.
To access the NAS system using the respective protocol, you need to enable the protocol first. To do this, EasyNAS creates a new File Sharing category in the sidebar on the left, which shows the currently installed protocols. You can enable them via the sliders. The protocols are then immediately available without rebooting the system.
To access the individual volumes from a desktop PC, open the respective desktop environment's file manager and connect to the desired storage via the corresponding settings option (Figure 5). The volumes can then be used like any conventional folder.
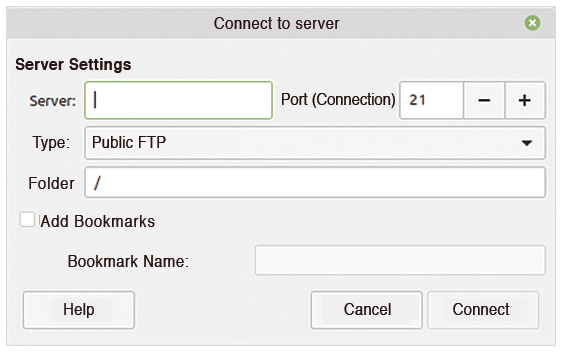 Figure 5: The common file managers offer simple dialogs to connect to network storage.
Weaknesses
In EasyNAS v1.0.0, you'll find the Scheduler and Backup & Restore options in sidebar on the left. These options are designed to allow the use of Btrfs snapshots in addition to backing up and restoring data. Currently, Scheduler and Backup & Restore are under development and cannot be used. For a backup, you still must manually create a complete copy of the data files, for example, via the file manager on a client computer.
Conclusions
EasyNAS gives you a network storage solution that does exactly what it's supposed to do without any frills – store and manage your data on a NAS system. EasyNAS's visually and ergonomically consistent user interface eliminates the need for time-consuming familiarization. Thanks to the openSUSE base and the Btrfs filesystem, EasyNAS's basic functionality can be expected to grow in future versions.
EasyNAS also stands out because of its frugal hardware requirements. Even ancient PCs can easily be converted into a NAS storage system, making EasyNAS suitable for home users without special knowledge who want to quickly set up and use network storage.
Infos
- EasyNAS: https://easynas.org
- EasyNAS images on SourceForge: https://sourceforge.net/projects/easynas/files/