
Arduino development on the command line
At Your Command

© Lead Image © innovari, Fotolia.com
When programming an Arduino microcontroller board for the first time, most people use the Arduino IDE, a graphical development environment. However, if you prefer the command line, you have a powerful alternative: Arduino CLI.
The Arduino [1] project was initially created in 2005 at the Interaction Design Institute Ivrea in Italy as an educational tool to teach students how to create and program interactive devices with sensors and actuators. Over time, the project expanded beyond its academic origins and became the go-to platform for hobbyists interested in programming microcontroller boards.
The Arduino graphical integrated development environment (IDE) [2] (Figure 1) has played a significant role in Arduino's success. It's easy to learn, without too many bells and whistles, but with all the basics you need. If you're satisfied with the Arduino IDE or if you use another IDE for Arduino, such as Visual Studio Code [3] with PlatformIO [4], feel free to continue using them. However, many developers have a command-line-centric workflow because it allows them to work more efficiently, while making it possible to check automatically whether an Arduino sketch still compiles correctly after a code or dependency update.
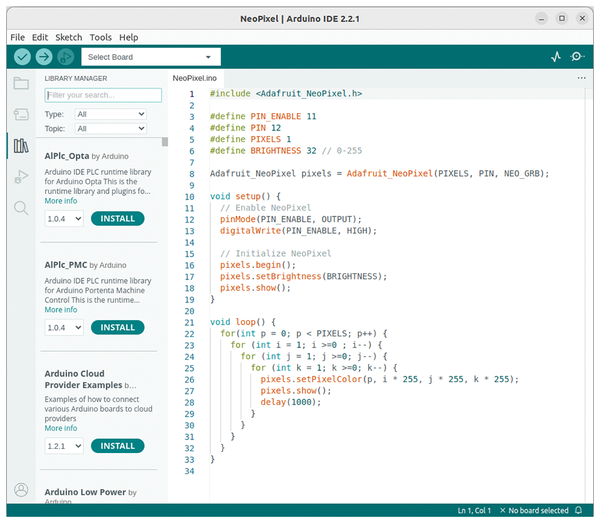 Figure 1: The Arduino IDE has played a significant role in Arduino's success.
Fortunately, if you prefer a command-line environment for Arduino development, you have an official solution: Arduino CLI [5]. Although its API is still considered unstable until a 1.0 release, it's already an integral part of the Arduino IDE. The command-line interface (CLI) is used by the IDE as a back end for tasks such as detecting boards, compiling sketches, uploading firmware to boards, installing cores and libraries, and more.
In this article, I explore how to use Arduino CLI to develop, compile, and upload Arduino sketches entirely from the command line.
Installing Arduino CLI
GitHub has pre-built Linux binaries for all Arduino CLI releases [6], but the easiest way to install the latest version is with an install script:
$ curl -fsSL https://raw.githubusercontent.com/arduino/arduino-cli/master/install.sh | BINDIR=~/.local/bin sh
This script installs the arduino-cli command into the ~/.local/bin directory. Change the BINDIR to any directory you want that's in your PATH environment variable. At the time of writing this article, this script installed Arduino CLI 0.34.2.
One additional task you need to perform to access your Arduino hardware over USB is to add your user to the dialout group if it is not already a member:
$ sudo usermod -a -G dialout $USER
You can check with the id or groups command. To activate this change, you'll need to log in again.
If you now run arduino-cli without any parameters, you'll see a list of supported subcommands (Figure 2). For each subcommand, you can request additional help by running either of the following commands:
arduino-cli subcommand --help
arduino-cli help subcommand
 Figure 2: The arduino-cli command supports several subcommands for Arduino software development.
If you are already somewhat familiar with how Arduino works, you'll be able to figure out a lot on your own with these commands, because the approach is similar to that of the Arduino IDE, but on the command line.
Configuration
Arduino CLI is configured by command-line flags, environment variables, and a configuration file, in that order of priority. If a configuration option is not set, Arduino CLI uses a default value.
Thanks to these default values and the ability to configure Arduino CLI with command-line flags and environment variables, the command doesn't strictly require a configuration file to function. However, it's easier to store some commonly used options in a configuration file, so to begin, I'll create one with the default settings:
$ arduino-cli config init
Config file written to: /home/koan/.arduino15/arduino-cli.yaml
After creating the configuration file, this command also helpfully shows the file's location. If you want to view the current configuration, use the command:
$ arduino-cli config dump
Listing 1 shows the output of this command for the default configuration. If you need to know the location of the configuration file at a later time, add the --verbose option to the previous command.
Listing 1
Default Configuration
Note that the content of the configuration file might differ from the output of the arduino-cli config dump command. If the configuration file doesn't have a specific configuration option, the command shows its default value instead.
Managing Arduino Cores
After installing Arduino CLI, the next thing you should do is update the local index of available Arduino cores:
$ arduino-cli core update-index
An Arduino core provides support for a specific board family. You can then query the list of installed cores:
$ arduino-cli core list
If you've already added cores from the Arduino IDE, you'll see them listed here as well because the command-line program uses the same installation files located in ~/.arduino15 and ~/Arduino. The command displays the installed and the latest available version of each core, together with its ID and name. For example, the core with ID arduino:avr supports all Arduino boards with an AVR microcontroller, including the Arduino Uno, Mega, Nano, and Duemilanove.
If the command shows that a newer version of a specific core is available, you can upgrade with the command:
$ arduino-cli core upgrade arduino:avr
You can also upgrade all installed cores at once:
$ arduino-cli core upgrade
If you want to find out which core you need for a specific board (e.g., the Arduino Nano 33 IoT), submit the command:
$ arduino-cli board listall nano
Listing 2 shows that the Arduino Nano 33 IoT requires the arduino:samd: core. The fully-qualified board name (FQBN) is the unique identifier for each board, including its associated core.
Listing 2
Query Board Core
If the previous command doesn't show the board in which you are interested (e.g., the Arduino Nano ESP32), it means the board is not supported by any of the installed cores. In that case, you need to search for the board in the Board Manager, which will show the core you need:
$ arduino-cli board search nano esp32
Board Name          FQBN Platform ID
Arduino Nano ESP32  arduino:esp32
The output reveals that the Nano ESP32 requires the arduino:esp32 core. You can then install this core with the command:
$ arduino-cli core install arduino:esp32
After installation, check again whether your board is now recognized (Listing 3).
Listing 3
Recognized Boards
Buy this article as PDF
(incl. VAT)
Buy Linux Magazine
US / Canada
UK / Australia
Subscribe to our Linux Newsletters
Find Linux and Open Source Jobs
Subscribe to our ADMIN Newsletters
Support Our Work
Linux Magazine content is made possible with support from readers like you. Please consider contributing when you’ve found an article to be beneficial.

News
-
First Release Candidate for Linux Kernel 6.14 Now Available
Linus Torvalds has officially released the first release candidate for kernel 6.14 and it includes over 500,000 lines of modified code, making for a small release.
-
System76 Refreshes Meerkat Mini PC
If you're looking for a small form factor PC powered by Linux, System76 has exactly what you need in the Meerkat mini PC.
-
Gnome 48 Alpha Ready for Testing
The latest Gnome desktop alpha is now available with plenty of new features and improvements.
-
Wine 10 Includes Plenty to Excite Users
With its latest release, Wine has the usual crop of bug fixes and improvements, along with some exciting new features.
-
Linux Kernel 6.13 Offers Improvements for AMD/Apple Users
The latest Linux kernel is now available, and it includes plenty of improvements, especially for those who use AMD or Apple-based systems.
-
Gnome 48 Debuts New Audio Player
To date, the audio player found within the Gnome desktop has been meh at best, but with the upcoming release that all changes.
-
Plasma 6.3 Ready for Public Beta Testing
Plasma 6.3 will ship with KDE Gear 24.12.1 and KDE Frameworks 6.10, along with some new and exciting features.
-
Budgie 10.10 Scheduled for Q1 2025 with a Surprising Desktop Update
If Budgie is your desktop environment of choice, 2025 is going to be a great year for you.
-
Firefox 134 Offers Improvements for Linux Version
Fans of Linux and Firefox rejoice, as there's a new version available that includes some handy updates.
-
Serpent OS Arrives with a New Alpha Release
After months of silence, Ikey Doherty has released a new alpha for his Serpent OS.