
Reporting Rasp Pi Data on a Node.js Web Server
Node.js on the Rasp Pi
ByCombine great hardware projects that use the Raspberry Pi GPIO pins and a Node.js web server that interacts with the underlying operating system and hardware, and you have a winning team.
Reading values from sensors connected to Raspberry Pi (Rasp Pi) GPIO pins and displaying the results on the command line is satisfying, but being able to access your sensors remotely is where things start getting useful. The best way to do that is to use a tried and tested medium, the web, and the way to do that is by using Node.js [1].
Node.js is not just for big corporate projects. In fact, Node.js (or more specifically, the node executable supplied in Node.js installations) is, at its simplest, just a JavaScript interpreter. That's it. It lets you write scripts in JavaScript and then it runs them, just as you would run a Bash, Python, or Perl script.
For example, you can make the following code in Listing 1 executable (chmod a+x countdown.js) and run it from the command line.
01 #!/<path/to/bin>/node
02
03 for (i=10; i>0; i--)
04 {
05    console.log(i);
06 }
07 console.log("Booom!");
The big thing about Node.js is its ecosystem – that is, its community and all the stuff people have built around it. Thanks to the astonishing number of modules and tools developers have created, you can use Node.js for nearly everything, from multiplatform mobile apps, to customized specialized web servers, like the one I'll show you how to construct in this article. First, however, you need to get Node.js set up on your Rasp Pi.
Installing Node.js
Although the easiest way of getting Node.js onto your Rasp Pi is with the usual apt-get install procedure, the versions of node and npm in the Raspbian/Debian repositories are ancient and will bork if you try to install any modern modules (including the digital humidity and temperature module you will use here). My advice is to get the newer, stabler version from the Node.js project website [2].
When deciding which version to pick, the original Rasp Pi uses an ARMv6 processor, but the Raspberry Pi 2 (RPi2) and RPi3 use ARMv7 CPUs. If in doubt, you can check what version CPU your Rasp Pi has by running the following from the command line:
cat /proc/cpuinfo
I'm using an RPi3, which comes with an ARMv7 CPU onboard, so I'll grab the ARMv7 version:
wget https://nodejs.org/dist/v<X.X.X>/node-v<X.X.X>-linux-armv7l.tar.xz
Where <X.X.X> is the version number.
You can then uncompress the file with:
tar xvf node-v<X.X.X>-linux-armv7l.tar.xz
The package comes with all its dependencies, so you don't need to install anything else. However, you do need to make sure that the Node.js bin/ directory is accessible from everywhere, so first rename your directory from node-v<X.X.X>-linux-armv7l to something simpler (e.g., nodejs):
mv node-v<X.X.X>-linux-armv7l nodejs
Then, include it into your PATH variable. Use your preferred text editor to open the .bashrc file, which lives in your /home/pi directory, and add the following line at the end:
export PATH=$PATH:/home/pi/<path/to>/nodejs/bin/
Save the file and exit your editor. Apply the changes with:
source .bashrc
From now on you will be able to access the Node.js tools from everywhere. For example, to try out the node console, type
node
in a terminal window, and you should see something that looks like Figure 1.
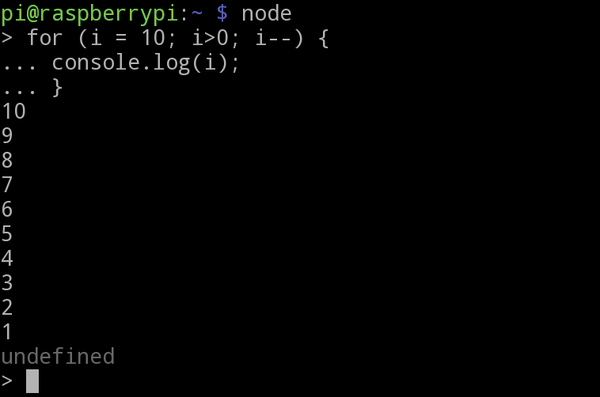 Figure 1: The Node shell allows you to try JavaScript commands.
If your JavaScript is a bit rusty, you can test your skills here and try running modules and extensions that Node.js incorporates into the language. To exit, press Ctrl+D.
When you are happy, you can use any text editor you like to write your own scripts and then use the node command to run them:
node yourscript.js
Or, you can make them executable and include a hashbang line (#!/<path/to/bin>/node), as shown in Listing 1, so that Bash knows which interpreter to use when it runs the script.
Your First Server
Where Node.js becomes really useful is when you use it to build a dedicated server. In this article, for example, you're going to see how to build a web server that reads input from a digital temperature and humidity (DHT) sensor (Figure 2) connected to your Rasp Pi and then serves the input up graphically on a web page.
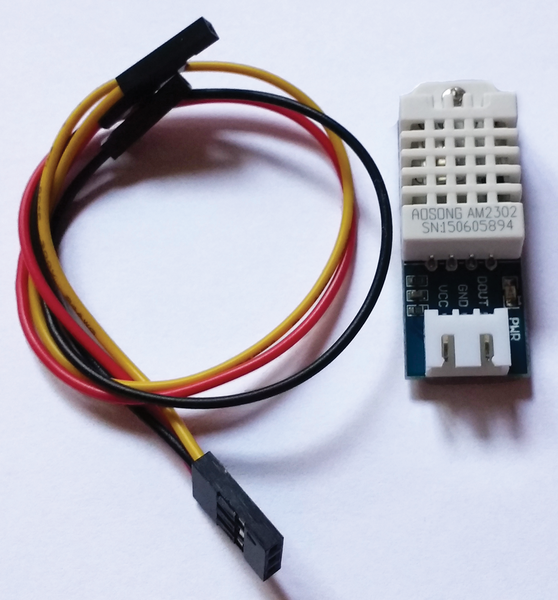 Figure 2: The DHT sensor used in this project.
A basic template for a web server that serves up static chunks of text looks like Listing 2.
01 var http = require("http");
02
03 http.createServer(function (request, response)
04 {
05   response.writeHead(200, {'Content-Type': 'text/html'});
06   response.write("<h1>Some</h1>");
07   response.write("<p>Formatted text.</p>");
08   response.end("<h2>The end</h2>" );
09 }).listen(8081);
10
11 console.log("Server running on port 8081");
Line 1 creates a new http object, which is the base for your web server. The require keyword is how you load a module into your script from Node.js. The http module comes as a standard part with all Node.js installations.
You create the server proper on line 3, which takes the shape of a callback function, or a function that is usually nameless and is passed as a parameter to another function. The createServer's callback function has two parameters: request is an object that manages the incoming messages sent by the users' web browsers. Every time you ask for a certain page through your browser, a request is sent to the web server. The response parameter, on the other hand, manages what the web server sends back to the user. The specific page (or if, for example, the page doesn't exist, a 404 error) is a response.
Line 5 tells the server the encoding of the response to be sent back in. In this case, you tell the server to serve back HTML-formatted text.
Line 6 starts sending the content. You can have as many response.write() lines as you want, and you can mix them with if, while, and other control statements. In this case, though, you just serve up static HTML and finish up with the response.end() call on line 8. Note that if you don't include a call to response.end(), your page will load forever.
Finally, createserver() has a listen() method (line 9), which you can use to set the port on which the server listens. Line 11 just prints out a reminder to the command line of the port on which your server is running.
Now you can run your server with:
node server_basic.js
Visit the IP of your Rasp Pi. In my case, my Rasp Pi can be found at 192.168.1.106 on my local network, so I visit http://192.168.1.106:8081. When the page loads, you'll see something like Figure 3.
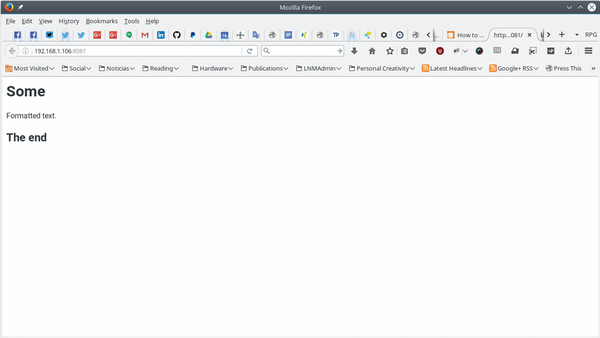 Figure 3: Point your browser to your Raspberry Pi's IP on port 8081 to see the page sent by your server.
DHT
In this experiment, you'll be using a DHT sensor. These kinds of sensors are common in basic electronic experiment sets for Arduino and are pretty great: Apart from giving you some real-world information to play with, they do the hard work of translating the analog data they collect. This is useful because, although Arduinos can read analog data, Rasp Pis can't. A DHT saves you the trouble of having to put an analog-to-digital converter (ADC) between the sensor and the Rasp Pi.
The model I have, pictured in Figure 2, is a DHT22 (DHT11s are usually blue), and it comes ready to be hooked up to the Rasp Pi directly. If you have one without the little bit of electronics, all you have to do is connect the sensor's VCC pin to the Rasp Pi's 3V3 or 5V pin (if one doesn't work for you, try the other) and a resistor with a resistance between 4.7K and 10K. For more information, see the Adafruit tutorial [3].
You can then connect the sensor's signal pin, the one that carries the data, to one of your GPIO pins. In Figure 4, you can see that I connected the sensor's VCC pin to one of the Rasp Pi's 5V pins (pin 2), the sensor's GND pin to pin 6 (Ground), and the sensor's signal pin to GPIO18 (pin 12). As for hardware, that's all there is to it.
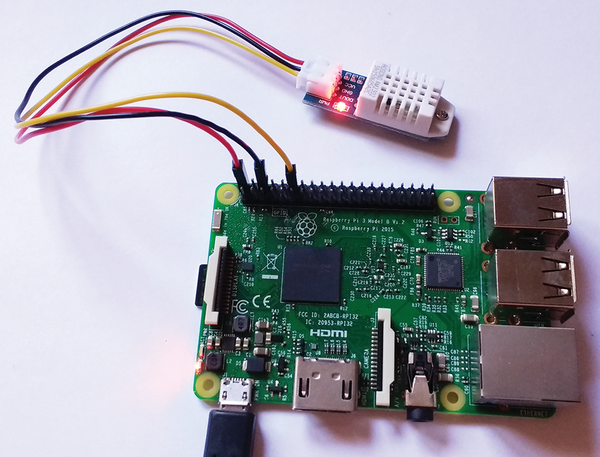 Figure 4: Hook up your sensor's VCC pin to a 5V or a 3V3 pin (if you have problems with one, try the other), its GND pin to a Ground pin on the Rasp Pi, and its signal pin to one of your GPIO pins.
Something else that makes this project super-easy is that Node.js has a module for these kinds of sensors! So convenient.
DHT Server
First, give your project somewhere to live by creating a directory:
mkdir dht_server
Then, cd into it (e.g., here, cd dht_server).
Before you install the DHT module with npm (see the "NPM" box for more on this tool), the module's documentation says that first you have to install the Broadcom BCM 2835 library to access GPIO pins directly.
Nearly as important as the node interpreter is npm, the Node Package Manager. NPM works much like Raspbian's Apt, but it installs Node.js libraries – or "modules," as they are known in Node parlance.
To install a module enter:
npm install <modulename>
As with other package managers, NPM will install not only the module, but all of its dependencies, as well.
However, you have installed the module "system wide" (i.e., for all of your Node.js projects), but one of the cool things about Node.js is that it allows you to build very compact servers for very specific uses, so installing every module system wide goes against the main philosophy of Node.js.
NPM offers you a way to install modules locally for your current project only. To do that, use the --save modifier:
npm install <modulename> --save
The module is now installed in the project's directory. NPM will also set up the module out of the way, in its own directory under node_modules/, somewhere the node interpreter is able to find it when you run your server.
To remove a package you can use npm rm <modulename>.
Beyond Package Managing
Despite its name, NPM can be used for far more than adding and removing packages. Try this in your project folder:
npm init
You will see that NPM asks you several questions, including your project's name and the name of the main script. When you're done, NPM creates a file called package.json with all the information you gave it (e.g., Listing 3). Also, every time you use NPM to install a new package for your application, it adds a new entry in the dependencies section, which is useful because, if you want to take you application to another machine or share it online, you just need to share the stuff you wrote and the package.json file. You can forget all about the other stuff you installed from the NPM repos, because when you (or another user) sets up an application in a new location, you can just run
npm install
without arguments; NPM will fetch and install everything it needs.
You will also be able to run your server with
npm start
regardless of what you called your main .js file. This is useful if a third party (or another program) needs to run your server and doesn't necessarily know what you called it.
Run npm help to find out what else NPM can do for you.
01 $ npm init
02 This utility will walk you through creating a package.json file. It only
   covers the most common items, and tries to guess sensible defaults.
03
04 See `npm help json` for definitive documentation on these fields
   and exactly what they do.
05
06 Use `npm install <pkg> --save` afterwards to install a package
   and save it as a dependency in the package.json file.
07
08 Press ^C at any time to quit.
09 name: (dht_server)
10 version: (1.0.0)
11 description: Show temperature and humidity data on a web page.
12 entry point: (index.js) server.js
13 test command:
14 git repository:
15 keywords: temperature, humidity, DHT, Raspberry Pi, web
16 author: Paul Brown
17 license: (ISC)
18 About to write to /home/pi/Node/dht_server/package.json:
19
20 {
21  "name": "dht_server",
22  "version": "1.0.0",
23  "description": "Show temperature and humidity data on a web page.",
24  "main": "server.js",
25  "dependencies": {
26    "node-dht-sensor": "^0.0.28"
27  },
28  "devDependencies": {},
29  "scripts": {
30    "test": "echo \"Error: no test specified\" && exit 1"
31  },
32  "keywords": [
33    "temperature",
34    "humidity",
35    "DHT",
36    "Raspberry",
37    "Pi",
38    "web"
39  ],
40  "author": "Paul Brown",
41  "license": "ISC"
42 }
43
44 Is this ok? (yes)
You will not find this library in your Rasp Pi's Raspbian repositories, so first you have to download it,
wget http://www.airspayce.com/mikem/bcm2835/bcm2835-1.50.tar.gz
uncompress it,
tar xvf bcm2835-1.50.tar.gz
and cd into the directory it creates, so you can build and install the library:
./configure
make
sudo make install
Now you can cd back out (cd ..) and install the Node.js DHT module:
npm install node-dht-sensor
Run npm init to set up your project. My setup looks like Listing 3. See lines 14-20 for the information I entered in response to the program queries. (Pressing Return accepts the default values shown in parentheses.)
As you can see, NPM "remembers" that you already installed node-dht-sensor and has included it as a dependency of your project (line 29).
Now check whether your sensor works with a very bare-bones script (Listing 4).
01 var sensorLib = require("node-dht-sensor");
02 var sensorResult = sensorLib.read(22, 18);
03 console.log("Temperature: " + sensorResult.temperature.toFixed(1) +
   "°  / Humidity: " +  sensorResult.humidity.toFixed(1) + "%");
Line 1 brings in the node-dht-sensor module and creates an object called sensorLib. In line 2, you then read the sensor with sensorLib.read(). This module takes two parameters: 22 is the type of sensor – if you have a DHT11, change this value to 11 – and 18 is the GPIO pin to which the sensor is connected. The sensorLib.read() function returns a JavaScript object containing the temperature and humidity detected by the sensor, which prints out to the command line (line 3).
To run the script, enter node DHTtest.js, and you'll see the temperature and humidity your sensor is currently detecting. For more fun, breathe on the sensor and you'll see the humidity shoot up.
DHT on a Web Page
At this stage, you could just print out the results as text to a web page (Listing 5), combining what you learned from Listing 2 with what you saw in Listing 4. However, that's boring, so do it visually instead.
01 var http = require("http");
02 var sensorLib = require("node-dht-sensor");
03
04 http.createServer(function (request, response)
05 {
06    var sensorResult = sensorLib.read(22, 18);
07    var resultTH="Temperature: " + sensorResult.temperature.toFixed(1) +
      "° C<br />Humidity:  " + sensorResult.humidity.toFixed(1) + "%";
08
09    response.writeHead(200, {'Content-Type': 'text/html'});
10    response.end(resultTH);
11 }).listen(8081);
12
13 console.log("Server running on port 8081");
By using CSS and a template, you can create a graphical representation for your sensor (Figure 5). Although Node.js has several modules that allow you to create HTML templates, you can create your own using the code in Listing 6.
01 <html>
02 <head>
03 </head>
04 <body>
05
06 <h2>Temperature</h2>
07 <div style="margin-left: 200px;">
08 0° C
09 </div>
10 <div style="margin-left: 202px; height: 0.5em; width: 0px;
border-style: solid; border-width: 1px;">
11 </div>
12
13 <div style="display: flex; width: 1000px;
border-style: solid; border-width: 2px;">
14 <div style="width: {0}px;">
15 </div>
16 <div style="width: {1}px; background-color: {2};
text-align:{3}; color:white;">
17 {4}° C
18 </div>
19 </div>
20
21 <h2>Humidity</h2>
22 <div style="display:flex; width:1004px">
23 <div style="margin-left: 0px;">
24 0%
25 </div>
26 <div style="width:1000px;">
27 </div>
28 <div style="margin-left: 0px;">
29 100%
30 </div>
31 </div>
32
33 <div style="display:flex; width:1004px">
34 <div style="height: 0.5em; width: 0px; border-style:
solid; border-width: 1px;">
35 </div>
36 <div style="width:1000px;">
37 </div>
38 <div style="height: 0.5em; width: 0px; border-style: solid;
border-width: 1px;">
39 </div>
40 </div>
41
42 <div style="width: 1000px; border-style: solid; border-width: 2px;">
43 <div style="width: {5}; background-color:green;
text-align:right; color:white;">
44 {6}%
45 </div>
46 </div>
47 </body>
48 </html>
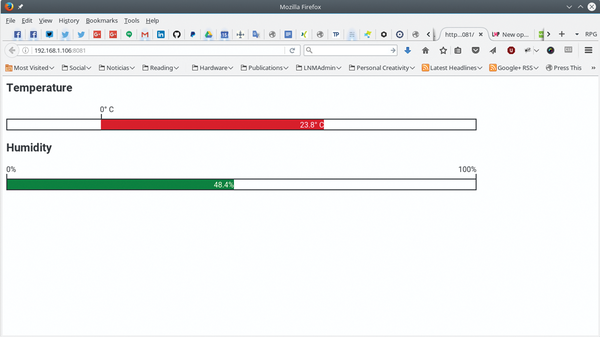 Figure 5: With CSS and an HTML web page template, you can create a graphical representation for the values read from your sensor.
You will notice several numbers in curly brackets (e.g., {0}, {1}, {2}, …) peppered around the markup, which you will seek out and change to values you calculate from your DHT sensor readout. Take a look at Listing 7 to see how this works.
01 var http = require("http");
02 var sensorLib = require("node-dht-sensor");
03 var fs = require("fs");
04
05 http.createServer(function (request, response)
06 {
07   fs.readFile('./bars_template.html', 'ascii', function(err, html_string)
08   {
09     if (err)
10     {
11       response.writeHead(500);
12       response.end("<h1>Error 500</h1>");
13     }
14     else
15     {
16       var sensorResult = sensorLib.read(22, 18);
17       response.writeHead(200, {'Content-Type': 'text/html'});
18       response.end(build_string(html_string.toString(),
         sensorResult.temperature.toFixed(1),
         sensorResult.humidity.toFixed(1)));
19     }
20   });
21 }).listen(8081);
22
23 console.log("Server running on port 8081");
24
25 function build_string(html_str, temperature, humidity)
26 {
27   var result_array=[];
28   var MAX_TEMP=40;
29   var MIN_TEMP=-10;
30
31   if (temperature > MAX_TEMP) { temperature = MAX_TEMP; }
32   if (temperature < MIN_TEMP) { temperature = MIN_TEMP; }
33
34   var R = parseInt(255 * ((temperature - MIN_TEMP) /
     (MAX_TEMP - MIN_TEMP)));
35   var G = 0;
36   var B = 255-R;
37
38   result_array[0]=200;
39   result_array[3]="right"
40
41   if (temperature<0)
42   {
43     result_array[0]=200+(temperature*20);
44     result_array[3]="left"
45   }
46
47   result_array[1]=Math.abs(temperature)*20;
48   result_array[2]= "rgb(" + R + "," + G + "," + B + ")";
49   result_array[4]=temperature;
50   result_array[5]=humidity*10;
51   result_array[6]=humidity;
52
53   var temp="";
54
55   for (i=0; i<result_array.length; i++)
56   {
57       temp=html_str.replace("{"+i.toString()+"}",
         result_array[i].toString());
58       html_str=temp;
59   }
60
61   return (html_str);
62 }
Starting from the top of Listing 7, lines 1-3 bring in the modules you need to make your server work. Notice on line 3 that you load the fs module, which is built into Node.js (i.e., you don't need to install it) and manages files and filesystems.
On line 7, right after starting the server proper, you put fs to work by trying to open your template file, bars_template.html. The second argument tells readFile() what encoding to expect the data in that file to use – in this case I want to load it in as a simple string of ASCII characters. The third argument specifies the callback function, which dumps the content of the file as one long string into html_string. If there is an error reading the file (lines 9-13) (e.g., you misspelled the file name), you throw a 500 error (Internal Server Error) and show an error message on the page.
If the file loads correctly, the server reads the data from the sensor (line 16), sends the 200 status code (OK) back to the browser (line 17), and then sends the HTML string as a page to the petitioning browser (line 18).
To build the HTML string, you call the build_string() function (lines 25-62). This function takes the character string containing the contents of the template file (html_str), the temperature, and the humidity as arguments.
You then set up an array (line 27) that is filled with the values you are going to switch into your template. Therefore, the contents of result_array[0] will take the place of {0}, result_array[1] will substitute in {1}, and so on.
For example, with {0}, because you can have negative or positive temperatures, 0°C is not at the beginning of the bar (see Listing 6, line 16; Figure 5). If your temperature is over 0°C, you have to insert an empty <div> that measures 200 pixels long (Listing 7, line 38). In this way, the above zero temperature bar starts at the 0°C mark and stretches off to the right, as you can see in Figure 5.
However, if the temperature is below zero, as in Figure 6, the temperature bar needs to stretch from the 0°C point to the left. To do that, you make the empty <div> shorter (Listing 7, line 43) and then align the temperature bar next to it.
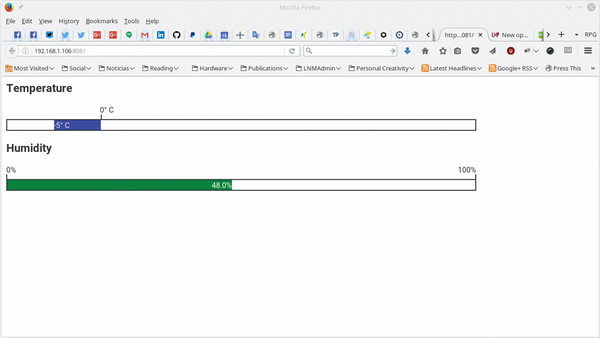 Figure 6: If the temperature is below 0°C, the bar must stretch toward the left.
Table 1 shows the rest of the values substituted into the placeholders and what they do.
| Placeholder | Substituted Data |
|---|---|
| {0} |
Space before the temperature bar; e.g., 200 |
| {1} |
Length of temperature bar |
| {2} |
Color of temperature bar; e.g., rgb(153, 0, 102). The lower the temperature, the bluer the bar; as temperatures rise, the bar becomes redder (Figures 5 and 6). |
| {3} |
Horizontal alignment of text on the temperature bar |
| {4} |
Temperature |
| {5} |
Length of humidity bar |
| {6} |
Humidity |
The code in lines 55-59 (Listing 7) iterates over the array and uses the JavaScript replace() function to substitute the placeholders in the HTML string read in from bars_template.html.
Try it out by running the server with
npm start
and visit your Rasp Pi's IP on port 8081 as before (i.e., http://<IP address>:8081). You'll see a graphical representation of the temperature and humidity at the location of your sensor.
Conclusion
Node.js is a great tool for Rasp Pi makers! It provides an easy and well-tested way of turning your Pi into an appliance that can serve up all sorts of information on a web page. Its immense catalog of modules makes creating complex web applications fast and painless.
If you would like to learn a bit more about Node.js, I wrote a two-part introduction for beginners for Linux.com [4].
- Node.js: https://nodejs.org/en/
- Download Node.js from the project website: https://nodejs.org/en/download/
- Connecting a DHT22 to a Rasp Pi: https://learn.adafruit.com/dht-humidity-sensing-on-raspberry-pi-with-gdocs-logging/wiring
- "Getting started with Node.js" by Paul Brown: https://www.linux.com/learn/how-get-started-writing-web-applications-nodejs
next page » 1 2 3
Subscribe to our Linux Newsletters
Find Linux and Open Source Jobs
Subscribe to our ADMIN Newsletters
Support Our Work
Linux Magazine content is made possible with support from readers like you. Please consider contributing when you’ve found an article to be beneficial.

News
-
UN Creates Open Source Portal
In a quest to strengthen open source collaboration, the United Nations Office of Information and Communications Technology has created a new portal.
-
Latest Linux Kernel RC Contains Changes Galore
Linux kernel 7.0-rc3 includes more changes than have been made in a single release in recent history.
-
Nitrux 6.0 Now Ready to Rock Your World
The latest iteration of the Debian-based distribution includes all kinds of newness.
-
Linux Foundation Reports that Open Source Delivers Better ROI
In a report that may surprise no one in the Linux community, the Linux Foundation found that businesses are finding a 5X return on investment with open source software.
-
Keep Android Open
Google has announced that, soon, anyone looking to develop Android apps will have to first register centrally with Google.
-
Kernel 7.0 Now in Testing
Linus Torvalds has announced the first Release Candidate (RC) for the 7.x kernel is available for those who want to test it.
-
Introducing matrixOS, an Immutable Gentoo-Based Linux Distro
It was only a matter of time before a developer decided one of the most challenging Linux distributions needed to be immutable.
-
Chaos Comes to KDE in KaOS
KaOS devs are making a major change to the distribution, and it all comes down to one system.
-
New Linux Botnet Discovered
The SSHStalker botnet uses IRC C2 to control systems via legacy Linux kernel exploits.
-
The Next Linux Kernel Turns 7.0
Linus Torvalds has announced that after Linux kernel 6.19, we'll finally reach the 7.0 iteration stage.